Flutter启动流程源码分析
前言
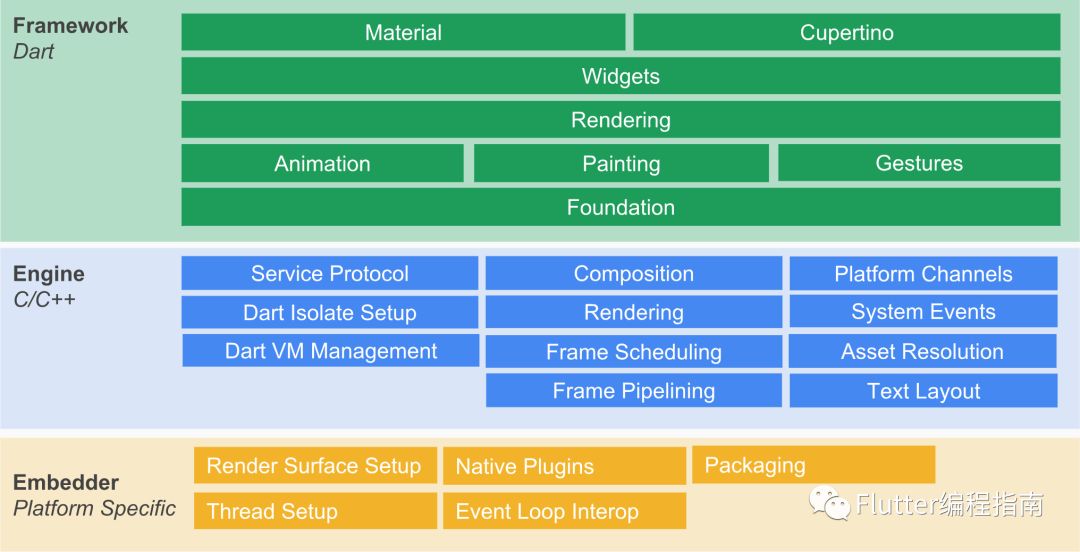
相信大家在学习Flutter的开始阶段都看过Flutter的架构图,如下
我们知道Flutter的应用层代码由Dart编写,Framework层提供了一系列Widget和其它API,那么这些Dart编写的代码是如何在特定平台上执行的呢,这就要从Flutter的启动过程说起了,了解了Flutter的启动过程,这个问题便迎刃而解。
我们通过架构图可以看出Embedder是由特定的平台实现,它其实就是将Flutter移植到各平台的中间层代码。Embedder层是Flutter启动的关键,其在应用启动后,由平台原生模块通过调用该层的API执行一系列操作,比如渲染层体系的设置、相关线程的创建等,最主要的是通过Embedder层初始化Flutter Engine,Engine中会创建DartVM、各种服务协议的初始化、Platform Channels的初始化等等,而后就会在DartVM中执行dart编写的入口方法main方法。至此,Flutter模块就启动成功了。
flutter启动分析
安卓平台代码分析
安卓平台对应的Embedder层代码在engine源码的 /flutter/shell/platform/android/ 目录下。
我们来根据flutter create my_app命令创建的Flutter项目demo来分析。
flutter文件资源准备和库加载
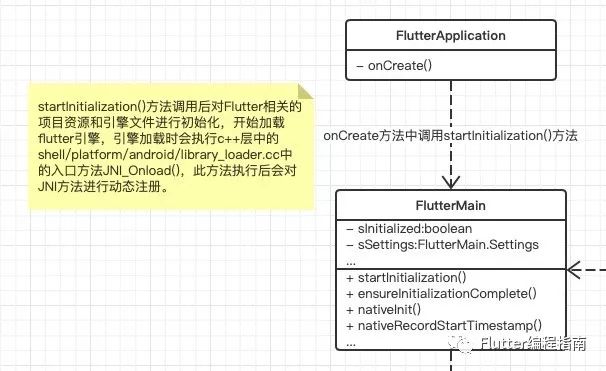
首先,my_app应用启动会先执行FlutterApplication,我们来看下该类中的生命周期方法onCreate方法的实现
- /flutter/shell/platform/android/io/flutter/app/FlutterApplication.java
@Override
@CallSuper
public void onCreate() {
    super.onCreate();
    FlutterMain.startInitialization(this);
}
FlutterMain类即是Embedder层的代码,该类的startInitialization方法实现如下
- /flutter/shell/platform/android/io/flutter/view/FlutterMain.java
public static void startInitialization(Context applicationContext) {
    startInitialization(applicationContext, new Settings());
}

public static void startInitialization(Context applicationContext, Settings settings) {
    if (Looper.myLooper() != Looper.getMainLooper()) {
      throw new IllegalStateException("startInitialization must be called on the main thread");
    }
    // Do not run startInitialization more than once.
    if (sSettings != null) {
      return;
    }

    sSettings = settings;

    long initStartTimestampMillis = SystemClock.uptimeMillis();
    initConfig(applicationContext);
    initAot(applicationContext);
    initResources(applicationContext);
    System.loadLibrary("flutter");

    long initTimeMillis = SystemClock.uptimeMillis() - initStartTimestampMillis;
    nativeRecordStartTimestamp(initTimeMillis);
}
由以上源码可知startInitialization方法需要在主线程中执行,该方法主要是初始化配置信息、初始化AOT模式下的变量(Debug下是JIT模式)、资源文件的初始化(主要是将asset目录下的flutter相关资源文件copy到私有目录下)等,最后会将以上初始化所用时间通过JNI方法传递到c++层做记录。
- /flutter/shell/platform/android/flutter_main.cc
static void RecordStartTimestamp(JNIEnv* env,
                                 jclass jcaller,
                                 jlong initTimeMillis) {
  int64_t initTimeMicros =
      static_cast<int64_t>(initTimeMillis) * static_cast<int64_t>(1000);
  blink::engine_main_enter_ts = Dart_TimelineGetMicros() - initTimeMicros;
}
关键java类的UML类图
flutter运行时环境初始化
FlutterApplication执行完onCreate方法后会执行启动页面MainActivity的生命周期方法。我们发现MainActivity的onCreate方法中并没有通过setContentView来设置显示的视图,由于MainActivity继承了FlutterActivity并重载了父类的onCreate方法,所以我们看下FlutterActivity的onCreate方法
- /flutter/shell/platform/android/io/flutter/app/FlutterActivity.java
private final FlutterActivityDelegate delegate = new FlutterActivityDelegate(this, this);
private final FlutterActivityEvents eventDelegate = delegate;

@Override
protected void onCreate(Bundle savedInstanceState) {
    super.onCreate(savedInstanceState);
    eventDelegate.onCreate(savedInstanceState);
}
FlutterActivity继承自Activity,那么视图的设置我们推测应该是在FlutterActivityDelegate的onCreate方法中,我们看下它的实现
- /flutter/shell/platform/android/io/flutter/app/FlutterActivityDelegate.java
@Override
public void onCreate(Bundle savedInstanceState) {
    if (Build.VERSION.SDK_INT >= Build.VERSION_CODES.LOLLIPOP) {
        Window window = activity.getWindow();
        window.addFlags(LayoutParams.FLAG_DRAWS_SYSTEM_BAR_BACKGROUNDS);
        window.setStatusBarColor(0x40000000);
        window.getDecorView().setSystemUiVisibility(PlatformPlugin.DEFAULT_SYSTEM_UI);
    }

    String[] args = getArgsFromIntent(activity.getIntent());
    FlutterMain.ensureInitializationComplete(activity.getApplicationContext(), args);

    flutterView = viewFactory.createFlutterView(activity);
    if (flutterView == null) {
        FlutterNativeView nativeView = viewFactory.createFlutterNativeView();
        flutterView = new FlutterView(activity, null, nativeView);
        flutterView.setLayoutParams(matchParent);
        activity.setContentView(flutterView);
        launchView = createLaunchView();
        if (launchView != null) {
            addLaunchView();
        }
    }

    if (loadIntent(activity.getIntent())) {
        return;
    }

    String appBundlePath = FlutterMain.findAppBundlePath(activity.getApplicationContext());
    if (appBundlePath != null) {
        runBundle(appBundlePath);
    }
}我们发现代码中有一句activity.setContentView(flutterView);即为当前MainActivity设置显示视图,那么flutterView是如何创建的呢,我们分析该语句之前的代码。
- 首先根据当前系统版本来设置沉浸式状态栏;
- 获取打开Activity时通过intent传入的参数信息;
- 执行FlutterMain的ensureInitializationComplete方法;
- 创建FlutterNativeView;
- 根据FlutterNativeView创建FlutterView;
- 将FlutterView设置为activity的内容视图;
- 通过FlutterMain查找appBundle所在路径,并执行appBundle;
我们先来分析第3步骤执行FlutterMain的ensureInitializationComplete方法,先看一下具体实现
- /flutter/shell/platform/android/io/flutter/view/FlutterMain.java
public static void ensureInitializationComplete(Context applicationContext, String[] args) {
    if (Looper.myLooper() != Looper.getMainLooper()) {
      throw new IllegalStateException("ensureInitializationComplete must be called on the main thread");
    }
    ...
    if (sInitialized) {
        return;
    }
    try {
        sResourceExtractor.waitForCompletion();

        List<String> shellArgs = new ArrayList<>();
        shellArgs.add("--icu-data-file-path=" + sIcuDataPath);
        ...

        String appBundlePath = findAppBundlePath(applicationContext);
        String appStoragePath = PathUtils.getFilesDir(applicationContext);
        String engineCachesPath = PathUtils.getCacheDirectory(applicationContext);
        nativeInit(applicationContext, shellArgs.toArray(new String[0]),
            appBundlePath, appStoragePath, engineCachesPath);

        sInitialized = true;
    } catch (Exception e) {
        Log.e(TAG, "Flutter initialization failed.", e);
        throw new RuntimeException(e);
    }
}我们发现该方法也要求必须在主线程中执行,且只执行一次,一旦执行过会通过sInitialized变量来进行标识下次不再执行。try-catch代码块中第一句sResourceExtractor.waitForCompletion()表示要等待初始化时的资源初始化完毕后才会向下执行,否则会一直阻塞。下面会初始化一些参数配置信息、flutter打包出的appBundle路径、应用存储目录、引擎缓存目录等信息,然后会调用JNI方法在c++层初始化这些信息,JNI方法对应的c++方法如下
- /flutter/shell/platform/android/flutter_main.cc
void FlutterMain::Init(JNIEnv* env,
                       jclass clazz,
                       jobject context,
                       jobjectArray jargs,
                       jstring bundlePath,
                       jstring appStoragePath,
                       jstring engineCachesPath) {
  std::vector<std::string> args;
  args.push_back("flutter");
  for (auto& arg : fml::jni::StringArrayToVector(env, jargs)) {
    args.push_back(std::move(arg));
  }
  auto command_line = fml::CommandLineFromIterators(args.begin(), args.end());
  auto settings = SettingsFromCommandLine(command_line);
  settings.assets_path = fml::jni::JavaStringToString(env, bundlePath);

  ...

  g_flutter_main.reset(new FlutterMain(std::move(settings)));
}c++层会将传入的参数保存到settings对象中,然后根据settings对象创建FlutterMain对象并保存到全局静态变量g_flutter_main中,供后续flutter引擎初始化使用。
接着,会通过viewFactory创建FlutterView对象,viewFactory就是实现了ViewFactory接口的FlutterActivity对象,查看其createFlutterView方法的实现发现返回null,此时就会执行if中的代码块,同样的,会通过viewFactory创建FlutterNativeView对象,我们查看源码发现同样返回null,这两个方法在FlutterActivity中的实现如下
- /flutter/shell/platform/android/io/flutter/app/FlutterActivity.java
@Override
public FlutterView createFlutterView(Context context) {
    return null;
}

@Override
public FlutterNativeView createFlutterNativeView() {
    return null;
}
紧接着,会开始使用FlutterView的带参数的构造方法创建FlutterView对象,其具体实现如下
- /flutter/shell/platform/android/io/flutter/view/FlutterView.java
public FlutterView(Context context, AttributeSet attrs, FlutterNativeView nativeView) {
    super(context, attrs);

    Activity activity = (Activity) getContext();
    if (nativeView == null) {
        mNativeView = new FlutterNativeView(activity.getApplicationContext());
    } else {
        mNativeView = nativeView;
    }
    ...

    mNativeView.attachViewAndActivity(this, activity);

    mSurfaceCallback = new SurfaceHolder.Callback() {
        @Override
        public void surfaceCreated(SurfaceHolder holder) {
            assertAttached();
            mNativeView.getFlutterJNI().onSurfaceCreated(holder.getSurface());
        }

        ...
    };
    getHolder().addCallback(mSurfaceCallback);
     ...

    // Configure the platform plugins and flutter channels.
    mFlutterLocalizationChannel = new MethodChannel(this, "flutter/localization", JSONMethodCodec.INSTANCE);
    ...
}
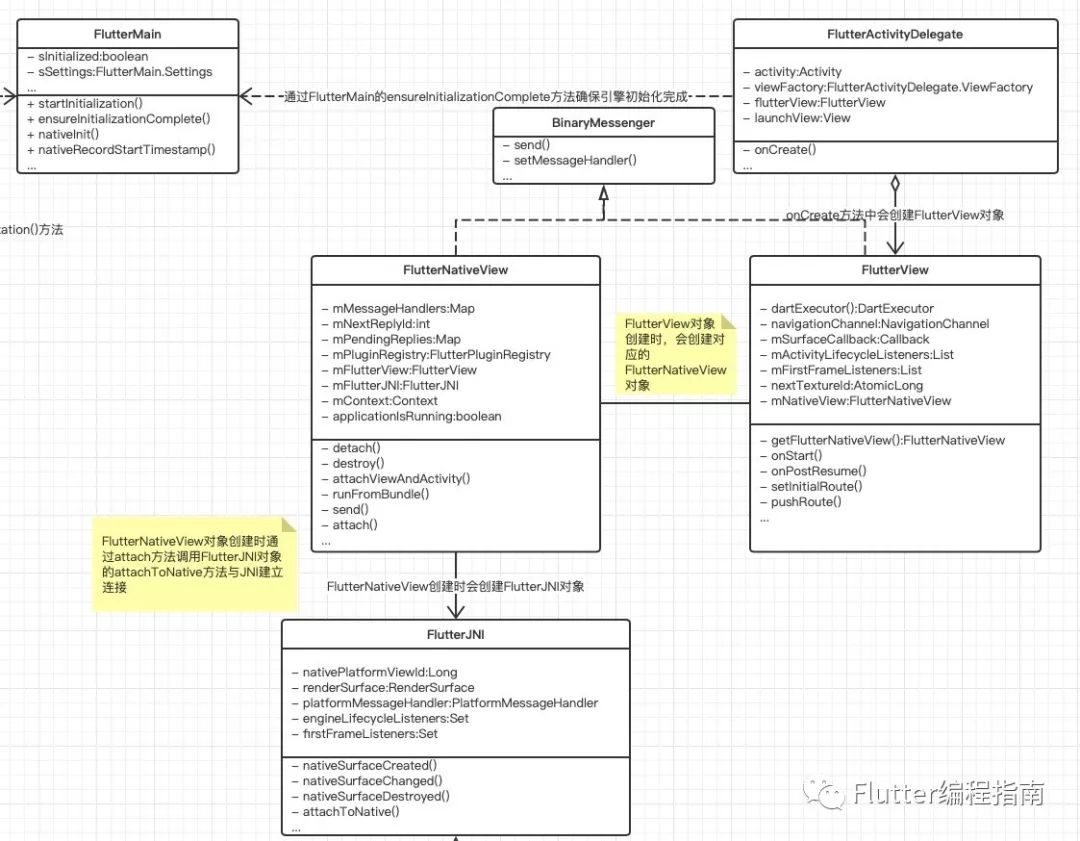
这里参数nativeView上文已经得出结论为null,要先通过FlutterNativeView的构造方法创建mNativeView对象,然后通过mNativeView调用attachViewAndActivity方法将FlutterView和当前的Activity做连接。
接着创建当前FlutterView(要知道它继承自SurfaceView)的mSurfaceCallback对象并添加到当前SurfaceHolder中以监听Surface的变化(如Surface的创建、改变和销毁等),这些变化会执行对应的回调方法,然后通过FlutterJNI的相关方法传递数据给Flutter engine层。
该方法中还会创建各种必要的平台插件和platform channel(用于flutter和原生之间的各种数据传递)。
接下来我们看下FlutterNativeView的构造方法实现
- /flutter/shell/platform/android/io/flutter/view/FlutterNativeView.java
public FlutterNativeView(Context context) {
    this(context, false);
}

public FlutterNativeView(Context context, boolean isBackgroundView) {
    mContext = context;
    mPluginRegistry = new FlutterPluginRegistry(this, context);
    mFlutterJNI = new FlutterJNI();
    mFlutterJNI.setRenderSurface(new RenderSurfaceImpl());
    mFlutterJNI.setPlatformMessageHandler(new PlatformMessageHandlerImpl());
    mFlutterJNI.addEngineLifecycleListener(new EngineLifecycleListenerImpl());
    attach(this, isBackgroundView);
    assertAttached();
    mMessageHandlers = new HashMap<>();
}
方法中会初始化mFlutterJNI对象,该对象的作用是通过JNI方法来传递信息给c++层,以便其根据不同的指令来通知flutter engine执行对应的操作。包括创建并启动Flutter engine、当前FlutterView的Surface生命周期的通知、传递platform数据给dart层、回传dart层调用platform层方法返回的结果数据等等。
该构造方法中有一个关键方法调用就是attach方法,其实现如下
- /flutter/shell/platform/android/io/flutter/view/FlutterNativeView.java
private void attach(FlutterNativeView view, boolean isBackgroundView) {
    mFlutterJNI.attachToNative(isBackgroundView);
}
通过mFlutterJNI的attachToNative方法实现java层和c++层的连接,实现如下
- /flutter/shell/platform/android/io/flutter/embedding/engine/FlutterJNI.java
@UiThread
public void attachToNative(boolean isBackgroundView) {
    ensureNotAttachedToNative();
    nativePlatformViewId = nativeAttach(this, isBackgroundView);
}

private native long nativeAttach(FlutterJNI flutterJNI, boolean isBackgroundView);
attachToNative方法中通过调用JNI方法nativeAttach将当前flutterJNI对象传递给c++层(后续一些dart层调用java层的方法就是通过该flutterJNI对象调用对应的方法实现的,比如上一篇分享的platform channel就使用到了),得到c++层返回的nativePlatformViewId(该值非常重要,是c++层AndroidShellHolder的对象指针值,后续会通过该值调用一系列c++层的方法执行操作)并将其保存以供后续使用。
这个阶段关键java类的UML类图
接着看下nativeAttach方法在c++中的实现,该方法非常重要,一系列Flutter engine的初始化就是在这里做的。
- /flutter/shell/platform/android/platform_view_android_jni.cc
static jlong AttachJNI(JNIEnv* env,
                       jclass clazz,
                       jobject flutterJNI,
                       jboolean is_background_view) {
  fml::jni::JavaObjectWeakGlobalRef java_object(env, flutterJNI);
  auto shell_holder = std::make_unique<AndroidShellHolder>(
      FlutterMain::Get().GetSettings(), java_object, is_background_view);
  if (shell_holder->IsValid()) {
    return reinterpret_cast<jlong>(shell_holder.release());
  } else {
    return 0;
  }
}我们发现该方法中通过之前初始化的保存在gfluttermain对象中的settings值和传入的java对象flutterJNI创建std::uniqueptr对象(该对象通过指针占有并管理AndroidShellHolder对象),该对象有效的情况下会调用release方法返回其管理对象的指针并释放对象的所有权,reinterpretcast()方法将该AndroidShellHolder对象指针强制转化为long类型的值并返回java层保存。
接下来我们通过AndroidShellHolder构造函数的实现来分析创建对象时都做了哪些操作
- /flutter/shell/platform/android/android_shell_holder.cc
AndroidShellHolder::AndroidShellHolder(
    blink::Settings settings,
    fml::jni::JavaObjectWeakGlobalRef java_object,
    bool is_background_view)
    : settings_(std::move(settings)), java_object_(java_object) {
  static size_t shell_count = 1;
  auto thread_label = std::to_string(shell_count++);
  ...
  if (is_background_view) {
    thread_host_ = {thread_label, ThreadHost::Type::UI};
  } else {
    thread_host_ = {thread_label, ThreadHost::Type::UI | ThreadHost::Type::GPU |
                                      ThreadHost::Type::IO};
  }
  ...

  fml::WeakPtr<PlatformViewAndroid> weak_platform_view;
  Shell::CreateCallback<PlatformView> on_create_platform_view =
      [is_background_view, java_object, &weak_platform_view](Shell& shell) {
        ...
        return platform_view_android;
      };
  Shell::CreateCallback<Rasterizer> on_create_rasterizer = [](Shell& shell) {
    return std::make_unique<Rasterizer>(shell.GetTaskRunners());
  };

  // The current thread will be used as the platform thread. Ensure that the
  // message loop is initialized.
  fml::MessageLoop::EnsureInitializedForCurrentThread();
  fml::RefPtr<fml::TaskRunner> gpu_runner;
  fml::RefPtr<fml::TaskRunner> ui_runner;
  fml::RefPtr<fml::TaskRunner> io_runner;
  fml::RefPtr<fml::TaskRunner> platform_runner =
      fml::MessageLoop::GetCurrent().GetTaskRunner();
  if (is_background_view) {
    ...
  } else {
    gpu_runner = thread_host_.gpu_thread->GetTaskRunner();
    ui_runner = thread_host_.ui_thread->GetTaskRunner();
    io_runner = thread_host_.io_thread->GetTaskRunner();
  }
  blink::TaskRunners task_runners(thread_label,     // label
                                  platform_runner,  // platform
                                  gpu_runner,       // gpu
                                  ui_runner,        // ui
                                  io_runner         // io
  );

  shell_ =
      Shell::Create(task_runners,             // task runners
                    settings_,                // settings
                    on_create_platform_view,  // platform view create callback
                    on_create_rasterizer      // rasterizer create callback
      );

  platform_view_ = weak_platform_view;
  FML_DCHECK(platform_view_);
  ...
 }
}传入的参数is_background_view值为false,通过前半部分代码我们发现会新建三个线程保存到thread_host_中,分别为gpu_thread、ui_thread和io_thread,而当前的线程也即是platform层的UI主线程作为platform_thread存在,四个线程分别持有一个TaskRunner对象,对应gpu_runner、ui_runner、io_runner和platform_runner,后续会通过这些TaskRunner来将一些操作放到对应的线程中去执行,下面大致列一下各线程在Flutter engine中的主要职责。
Platform Thread:Flutter Engine的接口调用
GPU Thread:执行设备GPU的指令
UI Thread:执行Dart root isolate代码
IO Thread:读取并处理图片数据
接下来会根据四个线程对应的TaskRunner创建task_runners对象,然后通过Shell::Create()方法创建shell_对象,看下该方法的具体实现
- /flutter/shell/common/shell.cc
std::unique_ptr<Shell> Shell::Create(
    blink::TaskRunners task_runners,
    blink::Settings settings,
    Shell::CreateCallback<PlatformView> on_create_platform_view,
    Shell::CreateCallback<Rasterizer> on_create_rasterizer) {
  PerformInitializationTasks(settings);

  auto vm = blink::DartVM::ForProcess(settings);
  FML_CHECK(vm) << "Must be able to initialize the VM.";
  return Shell::Create(std::move(task_runners),             //
                       std::move(settings),                 //
                       vm->GetIsolateSnapshot(),            //
                       blink::DartSnapshot::Empty(),        //
                       std::move(on_create_platform_view),  //
                       std::move(on_create_rasterizer)      //
  );
}
首先执行初始化任务(包括初始化绑定到skia的跟踪事件、skia引擎的初始化、国际化组件初始化等),接着根据settings值创建DartVM对象初始化Dart虚拟机,最后创建std::unique_ptr对象并返回。我们先看一下DartVM的创建过程
- /flutter/runtime/dart_vm.cc
fml::RefPtr<DartVM> DartVM::ForProcess(Settings settings) {
  return ForProcess(settings, nullptr, nullptr, nullptr);
}

static std::once_flag gVMInitialization;
static std::mutex gVMMutex;
static fml::RefPtr<DartVM> gVM;

fml::RefPtr<DartVM> DartVM::ForProcess(
    Settings settings,
    fml::RefPtr<DartSnapshot> vm_snapshot,
    fml::RefPtr<DartSnapshot> isolate_snapshot,
    fml::RefPtr<DartSnapshot> shared_snapshot) {
  std::lock_guard<std::mutex> lock(gVMMutex);
  std::call_once(gVMInitialization, [settings,          //
                                     vm_snapshot,       //
                                     isolate_snapshot,  //
                                     shared_snapshot    //
  ]() mutable {
    if (!vm_snapshot) {
      vm_snapshot = DartSnapshot::VMSnapshotFromSettings(settings);
    }
    ...
    if (!isolate_snapshot) {
      isolate_snapshot = DartSnapshot::IsolateSnapshotFromSettings(settings);
    }
    ...
    gVM = fml::MakeRefCounted<DartVM>(settings,                     //
                                      std::move(vm_snapshot),       //
                                      std::move(isolate_snapshot),  //
                                      std::move(shared_snapshot)    //
    );
  });
  return gVM;
}
此块代码表示创建DartVM对象的代码块只执行一次,即使从多个线程中被调用也是执行一次,保证DartVM只初始化一次,下面看下DartVM的构造方法实现
- /flutter/runtime/dart_vm.cc
DartVM::DartVM(const Settings& settings,
fml::RefPtr<DartSnapshot> vm_snapshot,
fml::RefPtr<DartSnapshot> isolate_snapshot,
fml::RefPtr<DartSnapshot> shared_snapshot)
: settings_(settings),
vm_snapshot_(std::move(vm_snapshot)),
isolate_snapshot_(std::move(isolate_snapshot)),
shared_snapshot_(std::move(shared_snapshot)),
weak_factory_(this) {
...
{
TRACE_EVENT0("flutter", "dart::bin::BootstrapDartIo");
dart::bin::BootstrapDartIo();
...
}
...
DartUI::InitForGlobal();
Dart_SetFileModifiedCallback(&DartFileModifiedCallback);
{
TRACE_EVENT0("flutter", "Dart_Initialize");
Dart_InitializeParams params = {};
...
params.create = reinterpret_cast<decltype(params.create)>(
DartIsolate::DartIsolateCreateCallback);
...
char* init_error = Dart_Initialize(¶ms);
...
}
...
}第一步,通过执行dart::bin::BootstrapDartIo()方法引导启动"dart:io"事件处理程序,具体方法调用如下
- /third_party/dart/runtime/bin/dart_io_api_impl.cc
void BootstrapDartIo() {
  // Bootstrap 'dart:io' event handler.
  TimerUtils::InitOnce();
  EventHandler::Start();
}第二步,通过执行DartUI::InitForGlobal()方法注册dart的各种本地方法,这些方法的注册类似于java的JNI方法注册,主要用于dart层调用c++方法(上一篇文章中通过platform channel执行dart调用platform方法就使用到了Window相关的本地方法调用),相关源码如下
- /flutter/lib/ui/dart_ui.cc
void DartUI::InitForGlobal() {
  if (!g_natives) {
    g_natives = new tonic::DartLibraryNatives();
    Canvas::RegisterNatives(g_natives);
    ...
    FrameInfo::RegisterNatives(g_natives);
    ...
    Window::RegisterNatives(g_natives);

    // Secondary isolates do not provide UI-related APIs.
    g_natives_secondary = new tonic::DartLibraryNatives();
    DartRuntimeHooks::RegisterNatives(g_natives_secondary);
    IsolateNameServerNatives::RegisterNatives(g_natives_secondary);
  }
}
这里仅看一下Window相关的本地方法注册
- /flutter/lib/ui/window/window.cc
void Window::RegisterNatives(tonic::DartLibraryNatives* natives) {
  natives->Register({
      {"Window_defaultRouteName", DefaultRouteName, 1, true},
      {"Window_scheduleFrame", ScheduleFrame, 1, true},
      {"Window_sendPlatformMessage", _SendPlatformMessage, 4, true},
      {"Window_respondToPlatformMessage", _RespondToPlatformMessage, 3, true},
      {"Window_render", Render, 2, true},
      {"Window_updateSemantics", UpdateSemantics, 2, true},
      {"Window_setIsolateDebugName", SetIsolateDebugName, 2, true},
  });
}第三步,通过执行Dart_Initialize(¶ms)方法来初始化Dart运行时环境,具体实现如下,紧贴出部分代码,其它代码请自行查看源码。
- /third_party/dart/runtime/vm/dart_api_impl.cc
DART_EXPORT char* Dart_Initialize(Dart_InitializeParams* params) {
  ...
  return Dart::Init(params->vm_snapshot_data, params->vm_snapshot_instructions,
                    params->create, params->shutdown, params->cleanup,
                    params->thread_exit, params->file_open, params->file_read,
                    params->file_write, params->file_close,
                    params->entropy_source, params->get_service_assets,
                    params->start_kernel_isolate);
}
具体的初始化工作会由Dart::Init()方法实现
- /third_party/dart/runtime/vm/dart.cc
char* Dart::Init(const uint8_t* vm_isolate_snapshot,
                 const uint8_t* instructions_snapshot,
                 Dart_IsolateCreateCallback create,
                 Dart_IsolateShutdownCallback shutdown,
                 Dart_IsolateCleanupCallback cleanup,
                 Dart_ThreadExitCallback thread_exit,
                 Dart_FileOpenCallback file_open,
                 Dart_FileReadCallback file_read,
                 Dart_FileWriteCallback file_write,
                 Dart_FileCloseCallback file_close,
                 Dart_EntropySource entropy_source,
                 Dart_GetVMServiceAssetsArchive get_service_assets,
                 bool start_kernel_isolate) {
  ...

  FrameLayout::Init();

  ...
至此,DartVM的初始化就完成了,最后DartVM对象会返回给Shell,Shell通过如下方法创建Shell对象
- /flutter/shell/common/shell.cc
std::unique_ptr<Shell> Shell::Create(
    blink::TaskRunners task_runners,
    blink::Settings settings,
    fml::RefPtr<blink::DartSnapshot> isolate_snapshot,
    fml::RefPtr<blink::DartSnapshot> shared_snapshot,
    Shell::CreateCallback<PlatformView> on_create_platform_view,
    Shell::CreateCallback<Rasterizer> on_create_rasterizer) {
  ...
  fml::AutoResetWaitableEvent latch;
  std::unique_ptr<Shell> shell;
  fml::TaskRunner::RunNowOrPostTask(
      task_runners.GetPlatformTaskRunner(),
      [&latch,                                          //
       &shell,                                          //
       task_runners = std::move(task_runners),          //
       settings,                                        //
       isolate_snapshot = std::move(isolate_snapshot),  //
       shared_snapshot = std::move(shared_snapshot),    //
       on_create_platform_view,                         //
       on_create_rasterizer                             //
  ]() {
        shell = CreateShellOnPlatformThread(std::move(task_runners),      //
                                            settings,                     //
                                            std::move(isolate_snapshot),  //
                                            std::move(shared_snapshot),   //
                                            on_create_platform_view,      //
                                            on_create_rasterizer          //
        );
        latch.Signal();
      });
  latch.Wait();
  return shell;
}
最终会通过Shell中的CreateShellOnPlatformThread方法在Platform Thread中创建Shell对象,由于该方法中代码比较多,我们分块来进行分析,首先看一下Shell对象的创建
- /flutter/shell/common/shell.cc
auto shell = std::unique_ptr<Shell>(new Shell(task_runners, settings));通过构造方法创建shell对象,紧接着开始执行四个关键的代码块
- /flutter/shell/common/shell.cc
// Create the platform view on the platform thread (this thread).
auto platform_view = on_create_platform_view(*shell.get());
if (!platform_view || !platform_view->GetWeakPtr()) {
return nullptr;
}- /flutter/shell/platform/android/android_shell_holder.cc
fml::WeakPtr<PlatformViewAndroid> weak_platform_view;
Shell::CreateCallback<PlatformView> on_create_platform_view =
  [is_background_view, java_object, &weak_platform_view](Shell& shell) {
    std::unique_ptr<PlatformViewAndroid> platform_view_android;
    if (is_background_view) {
      ...

    } else {
      platform_view_android = std::make_unique<PlatformViewAndroid>(
          shell,                   // delegate
          shell.GetTaskRunners(),  // task runners
          java_object,             // java object handle for JNI interop
          shell.GetSettings()
              .enable_software_rendering  // use software rendering
      );
    }
    weak_platform_view = platform_view_android->GetWeakPtr();
    return platform_view_android;
  };
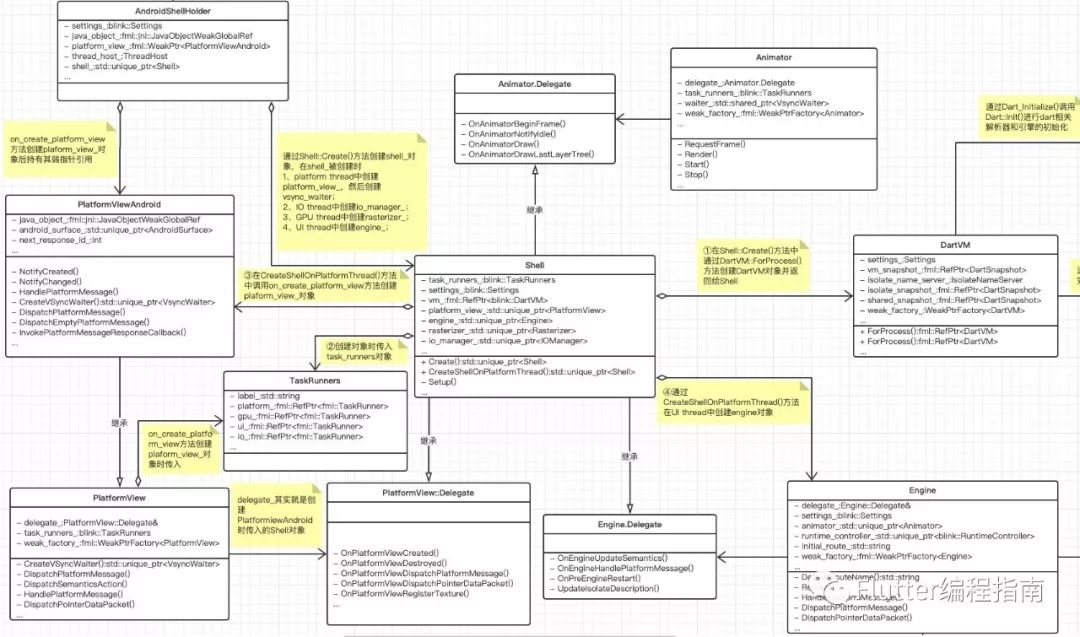
关键代码块一:在platform thread中根据传入的on_create_platform_view函数创建PlatformViewAndroid对象并交由platform_view管理,如上该函数在AndroidShellHolder的构造函数中声明。
- /flutter/shell/common/shell.cc
// Create the IO manager on the IO thread.
fml::AutoResetWaitableEvent io_latch;
std::unique_ptr<IOManager> io_manager;
auto io_task_runner = shell->GetTaskRunners().GetIOTaskRunner();
fml::TaskRunner::RunNowOrPostTask(
  io_task_runner,
  [&io_latch,       //
   &io_manager,     //
   &platform_view,  //
   io_task_runner   //
]() {
    io_manager = std::make_unique<IOManager>(
        platform_view->CreateResourceContext(), io_task_runner);
    io_latch.Signal();
  });
io_latch.Wait();
关键代码块二:在IO thread中创建IOManager对象,并交由io_manager管理。
- /flutter/shell/common/shell.cc
// Create the rasterizer on the GPU thread.
fml::AutoResetWaitableEvent gpu_latch;
std::unique_ptr<Rasterizer> rasterizer;
fml::WeakPtr<blink::SnapshotDelegate> snapshot_delegate;
fml::TaskRunner::RunNowOrPostTask(
  task_runners.GetGPUTaskRunner(), [&gpu_latch,            //
                                    &rasterizer,           //
                                    on_create_rasterizer,  //
                                    shell = shell.get(),   //
                                    &snapshot_delegate     //
]() {
    if (auto new_rasterizer = on_create_rasterizer(*shell)) {
      rasterizer = std::move(new_rasterizer);
      snapshot_delegate = rasterizer->GetSnapshotDelegate();
    }
    gpu_latch.Signal();
  });

gpu_latch.Wait();- /flutter/shell/platform/android/android_shell_holder.cc
Shell::CreateCallback<Rasterizer> on_create_rasterizer = [](Shell& shell) {
return std::make_unique<Rasterizer>(shell.GetTaskRunners());
};
关键代码块三:在GPU thread中根据传入的on_create_rasterizer函数创建Rasterizer对象并交由rasterizer管理,如上该函数也在AndroidShellHolder的构造函数中声明。
- /flutter/shell/common/shell.cc
// Create the engine on the UI thread.
fml::AutoResetWaitableEvent ui_latch;
std::unique_ptr<Engine> engine;
fml::TaskRunner::RunNowOrPostTask(
  shell->GetTaskRunners().GetUITaskRunner(),
  fml::MakeCopyable([&ui_latch,                                         //
                     &engine,                                           //
                     shell = shell.get(),                               //
                     isolate_snapshot = std::move(isolate_snapshot),    //
                     shared_snapshot = std::move(shared_snapshot),      //
                     vsync_waiter = std::move(vsync_waiter),            //
                     snapshot_delegate = std::move(snapshot_delegate),  //
                     io_manager = io_manager->GetWeakPtr()              //
]() mutable {
    const auto& task_runners = shell->GetTaskRunners();

    // The animator is owned by the UI thread but it gets its vsync pulses
    // from the platform.
    auto animator = std::make_unique<Animator>(*shell, task_runners,
                                               std::move(vsync_waiter));

    engine = std::make_unique<Engine>(*shell,                        //
                                      shell->GetDartVM(),            //
                                      std::move(isolate_snapshot),   //
                                      std::move(shared_snapshot),    //
                                      task_runners,                  //
                                      shell->GetSettings(),          //
                                      std::move(animator),           //
                                      std::move(snapshot_delegate),  //
                                      std::move(io_manager)          //
    );
    ui_latch.Signal();
  }));

ui_latch.Wait();
关键代码块四:在UI thread中创建Engine对象,并交由engine管理。
最后会通过shell的Setup方法调用将platform_view、io_manager、rasterizer和engine四个unique_ptr保存到Shell对象中交由Shell对象管理
- /flutter/shell/common/shell.cc
if (!shell->Setup(std::move(platform_view),  //
                std::move(engine),         //
                std::move(rasterizer),     //
                std::move(io_manager))     //
) {
    return nullptr;
}
Shell对象通过Shell::Create()创建完成后返回给AndroidShellHolder持有。至此,Embedder层就通过Shell对象与engine层建立了连接,后续的一切操作都可以通过Shell对象来进行。而创建好的AndroidShellHolder对象指针值又返回给了java层,最终java层便可以使用该指针值通过JNI方法调用拿到Embedder层的AndroidShellHolder对象,进而通过Shell对象向engine层发送一系列操作指令。
这个阶段关键c++类的UML类图
flutter中dart层代码执行
以上流程已经为dart层代码执行创建好了运行时环境,那么接下来就应该加载dart层相关的代码执行了,这样我们就可以看到dart编写的widget显示在MainActivity界面上了。
我们回到上面分析的FlutterActivityDelegate的onCreate()方法中,当FlutterView和FlutterNativeView创建成功后,会通过activity.setContentView(flutterView);将FlutterView作为activity的内容视图,而flutter层的UI就是被渲染到FlutterView上的,所以当前MainActivity展示出来的就是我们的flutter UI界面。
当然,代码走到此时,dart层代码还没有运行,所以界面上还是显示空白,我们看onCreate()代码块的最后部分,找到appBundle然后通过runBundle方法开始执行,runBundle方法如下
- /flutter/shell/platform/android/io/flutter/app/FlutterActivityDelegate.java
private void runBundle(String appBundlePath) {
    if (!flutterView.getFlutterNativeView().isApplicationRunning()) {
        FlutterRunArguments args = new FlutterRunArguments();
        ArrayList<String> bundlePaths = new ArrayList<>();
        ResourceUpdater resourceUpdater = FlutterMain.getResourceUpdater();
        if (resourceUpdater != null) {
            File patchFile = resourceUpdater.getInstalledPatch();
            JSONObject manifest = resourceUpdater.readManifest(patchFile);
            if (resourceUpdater.validateManifest(manifest)) {
                bundlePaths.add(patchFile.getPath());
            }
        }
        bundlePaths.add(appBundlePath);
        args.bundlePaths = bundlePaths.toArray(new String[0]);
        args.entrypoint = "main";
        flutterView.runFromBundle(args);
    }
}第一次启动flutter页面isApplicationRunning()为false,执行if语句后的代码块,先检查是否有更新的flutter相关资源(用于动态更新,2019年flutter团队的一个目标之一,这里是先预埋了代码,应该还没有起作用),没有更新的bundle包,则设置对应的运行参数,然后使用flutterView.runFromBundle()方法开始执行。
- /flutter/shell/platform/android/io/flutter/view/FlutterView.java
public void runFromBundle(FlutterRunArguments args) {
    assertAttached();
    preRun();
    mNativeView.runFromBundle(args);
    postRun();
}
调用FlutterNativeView的runFromBundle方法执行
- /flutter/shell/platform/android/io/flutter/view/FlutterNativeView.java
public void runFromBundle(FlutterRunArguments args) {
    boolean hasBundlePaths = args.bundlePaths != null && args.bundlePaths.length != 0;
    ...
    if (hasBundlePaths) {
        runFromBundleInternal(args.bundlePaths, args.entrypoint, args.libraryPath);
    } else {
        ...
    }
}

private void runFromBundleInternal(String[] bundlePaths, String entrypoint,
    String libraryPath) {
    ...
    mFlutterJNI.runBundleAndSnapshotFromLibrary(
        bundlePaths,
        entrypoint,
        libraryPath,
        mContext.getResources().getAssets()
    );

    applicationIsRunning = true;
}
最终是通过FlutterJNI的方法来调用JNI方法执行
- /flutter/shell/platform/android/io/flutter/embedding/engine/FlutterJNI.java
@UiThread
public void runBundleAndSnapshotFromLibrary(
  @NonNull String[] prioritizedBundlePaths,
  @Nullable String entrypointFunctionName,
  @Nullable String pathToEntrypointFunction,
  @NonNull AssetManager assetManager
) {
    ensureAttachedToNative();
    nativeRunBundleAndSnapshotFromLibrary(
        nativePlatformViewId,
        prioritizedBundlePaths,
        entrypointFunctionName,
        pathToEntrypointFunction,
        assetManager
    );
}

private native void nativeRunBundleAndSnapshotFromLibrary(
  long nativePlatformViewId,
  @NonNull String[] prioritizedBundlePaths,
  @Nullable String entrypointFunctionName,
  @Nullable String pathToEntrypointFunction,
  @NonNull AssetManager manager
);
到这里,我们发现会调用JNI方法传入nativePlatformViewId参数,这个就是我们前面提到的AndroidShellHolder对象的指针值,此时的prioritizedBundlePaths数组中只有一个值类似"/data/data/包名/flutter/flutter_assets/"的路径值,entrypointFunctionName为"main",pathToEntrypointFunction为null。接下来看下JNI对应c++方法的实现
- /flutter/shell/platform/android/platform_view_android_jni.cc
static void RunBundleAndSnapshotFromLibrary(JNIEnv* env,
                                            jobject jcaller,
                                            jlong shell_holder,
                                            jobjectArray jbundlepaths,
                                            jstring jEntrypoint,
                                            jstring jLibraryUrl,
                                            jobject jAssetManager) {
  auto asset_manager = std::make_shared<blink::AssetManager>();
  for (const auto& bundlepath :
       fml::jni::StringArrayToVector(env, jbundlepaths)) {
    ...
    const auto file_ext_index = bundlepath.rfind(".");
    if (bundlepath.substr(file_ext_index) == ".zip") {
      ...
    } else {
      asset_manager->PushBack(
          std::make_unique<blink::DirectoryAssetBundle>(fml::OpenDirectory(
              bundlepath.c_str(), false, fml::FilePermission::kRead)));

      ...
    }
  }

  auto isolate_configuration = CreateIsolateConfiguration(*asset_manager);
  ...

  RunConfiguration config(std::move(isolate_configuration),
                          std::move(asset_manager));

  {
    auto entrypoint = fml::jni::JavaStringToString(env, jEntrypoint);
    auto libraryUrl = fml::jni::JavaStringToString(env, jLibraryUrl);

    if ((entrypoint.size() > 0) && (libraryUrl.size() > 0)) {
      ...
    } else if (entrypoint.size() > 0) {
      config.SetEntrypoint(std::move(entrypoint));
    }
  }

  ANDROID_SHELL_HOLDER->Launch(std::move(config));
}该段代码首先将循环jbundlepaths中的信息将根据bundlepath创建DirectoryAssetBundle对象放到交由assetmanager管理,然后创建运行配置对象config,最后通过ANDROID_SHELL_HOLDER->Launch(std::move(config));根据运行配置信息启动。注意ANDROIDSHELL_HOLDER是一个宏,具体实现为
- /flutter/shell/platform/android/platform_view_android_jni.cc
#define ANDROID_SHELL_HOLDER \
  (reinterpret_cast<shell::AndroidShellHolder*>(shell_holder))
即是将传过来的java层持有的AndroidShellHolder指针值强转为AndroidShellHolder对象指针,此时就可以通过对象指针调用其方法执行所需要的操作了。接下来看下Launch方法的实现
- /flutter/shell/platform/android/android_shell_holder.cc
void AndroidShellHolder::Launch(RunConfiguration config) {
  ...
  shell_->GetTaskRunners().GetUITaskRunner()->PostTask(
      fml::MakeCopyable([engine = shell_->GetEngine(),  //
                         config = std::move(config)     //
  ]() mutable {
        ...
        if (!engine || engine->Run(std::move(config)) ==
                           shell::Engine::RunStatus::Failure) {
          ...
        } else {
          ...
        }
      }));
}
我们可以看到engine运行dart层代码是通过UITaskRunner在UI Thread中执行的,这就是前面说的创建UI Thread的主要作用,下面看下engine的Run方法
- /flutter/shell/common/engine.cc
Engine::RunStatus Engine::Run(RunConfiguration configuration) {
  ...

  auto isolate_launch_status =
      PrepareAndLaunchIsolate(std::move(configuration));

  ...

  return isolate_running ? Engine::RunStatus::Success
                         : Engine::RunStatus::Failure;
}

shell::Engine::RunStatus Engine::PrepareAndLaunchIsolate(
    RunConfiguration configuration) {
  ...

  auto isolate_configuration = configuration.TakeIsolateConfiguration();

  std::shared_ptr<blink::DartIsolate> isolate =
      runtime_controller_->GetRootIsolate().lock();

  ...

  if (configuration.GetEntrypointLibrary().empty()) {
    if (!isolate->Run(configuration.GetEntrypoint())) {
      ...
    }
  } else {
    ...
  }

  return RunStatus::Success;
}
最终会通过DartIsolate的Run方法来执行
- /flutter/runtime/dart_isolate.cc
bool DartIsolate::Run(const std::string& entrypoint_name) {
  ...

  Dart_Handle entrypoint =
      Dart_GetField(Dart_RootLibrary(), tonic::ToDart(entrypoint_name.c_str()));
  ...

  Dart_Handle isolate_lib = Dart_LookupLibrary(tonic::ToDart("dart:isolate"));
  if (tonic::LogIfError(isolate_lib)) {
    return false;
  }

  Dart_Handle isolate_args[] = {
      entrypoint,
      Dart_Null(),
  };

  if (tonic::LogIfError(Dart_Invoke(
          isolate_lib, tonic::ToDart("_startMainIsolate"),
          sizeof(isolate_args) / sizeof(isolate_args[0]), isolate_args))) {
    return false;
  }

  ...
  return true;
}通过entrypoint_name创建执行入口Dart句柄entrypoint,通过Dart_LookupLibrary方法查找"dart:isolate"库的句柄isolate_lib,这里需要注意isolate_args[]句柄数组,第一个值为entrypoint,第二个值为Dart_Null(),然后通过Dart_Invoke方法调用执行
- /third_party/dart/runtime/vm/dart_api_impl.cc
DART_EXPORT Dart_Handle Dart_Invoke(Dart_Handle target,
                                    Dart_Handle name,
                                    int number_of_arguments,
                                    Dart_Handle* arguments) {
  ...

  String& function_name =
      String::Handle(Z, Api::UnwrapStringHandle(Z, name).raw());
  ...
  const Object& obj = Object::Handle(Z, Api::UnwrapHandle(target));
  ...
  if (obj.IsType()) {
    ...
  } else if (obj.IsNull() || obj.IsInstance()) {
    ...
  } else if (obj.IsLibrary()) {
    // Check whether class finalization is needed.
    const Library& lib = Library::Cast(obj);

    ...

    if (Library::IsPrivate(function_name)) {
      function_name = lib.PrivateName(function_name);
    }

    ...

    return Api::NewHandle(
        T, lib.Invoke(function_name, args, arg_names, respect_reflectable));
  } else {
    ...
  }
}通过上面isolate_lib的创建方法Dart_LookupLibrary的实现可知obj为一个Library对象,最后通过lib.Invoke()方法来执行dart方法,dart中对应的具体方法实现为
- /third_party/dart/runtime/lib/isolate_patch.dart
@pragma("vm:entry-point")
void _startMainIsolate(Function entryPoint, List<String> args) {
  _startIsolate(
      null, // no parent port
      entryPoint,
      args,
      null, // no message
      true, // isSpawnUri
      null, // no control port
      null); // no capabilities
}
第一个参数entryPoint即为前文通过"main"查找的main()入口函数,也即是我们编写的dart中main.dart文件中的main()函数,args为null最终通过调用以下_startIsolate方法运行。
- /third_party/dart/runtime/lib/isolate_patch.dart
@pragma("vm:entry-point")
void _startIsolate(
    SendPort parentPort,
    Function entryPoint,
    List<String> args,
    var message,
    bool isSpawnUri,
    RawReceivePort controlPort,
    List capabilities) {
  if (controlPort != null) {
    controlPort.handler = (_) {}; // Nobody home on the control port.
  }

  ...

  RawReceivePort port = new RawReceivePort();
  port.handler = (_) {
    port.close();

    if (isSpawnUri) {
      if (entryPoint is _BinaryFunction) {
        (entryPoint as dynamic)(args, message);
      } else if (entryPoint is _UnaryFunction) {
        (entryPoint as dynamic)(args);
      } else {
        entryPoint();
      }
    } else {
      entryPoint(message);
    }
  };
  // Make sure the message handler is triggered.
  port.sendPort.send(null);
}我们在mait.dart中定义的main()函数并没有任何参数,最后直接通过entryPoint()将main()函数调起。到此,我们的dart层代码就运行起来了。后续就是通过main()函数中的runApp()方法调用开始执行各种Widget相关绑定、Element的创建、RenderObject的创建,然后合成帧数据供下一次gsync信号接收时渲染数据到SurfaceView上。
iOS平台代码分析
iOS平台对应的Embedder层代码在engine源码的/flutter/shell/platform/darwin/目录下
我们同样根据flutter create my_app命令创建的Flutter项目demo来分析iOS平台上flutter的启动流程。
AppDelegate继承自FlutterAppDelegate,我们看下FlutterAppDelegate的生命周期执行情况
- /flutter/shell/platform/darwin/ios/framework/Source/FlutterAppDelegate.mm
- (instancetype)init {
  if (self = [super init]) {
    _lifeCycleDelegate = [[FlutterPluginAppLifeCycleDelegate alloc] init];
  }
  return self;
}

- (BOOL)application:(UIApplication*)application
    willFinishLaunchingWithOptions:(NSDictionary*)launchOptions {
  return [_lifeCycleDelegate application:application willFinishLaunchingWithOptions:launchOptions];
}

- (BOOL)application:(UIApplication*)application
    didFinishLaunchingWithOptions:(NSDictionary*)launchOptions {
  return [_lifeCycleDelegate application:application didFinishLaunchingWithOptions:launchOptions];
}
和安卓中类似,FluttAppDelegate生命周期方法中的处理由代理类对象_lifeCycleDelegate做具体处理,init方法中会对该对象进行初始化,我们先看下初始化和对应的生命周期代理方法都做了什么
- /flutter/shell/platform/darwin/ios/framework/Source/FlutterPluginAppLifeCycleDelegate.mm
static const char* kCallbackCacheSubDir = "Library/Caches/";

- (instancetype)init {
  if (self = [super init]) {
    std::string cachePath = fml::paths::JoinPaths({getenv("HOME"), kCallbackCacheSubDir});
    [FlutterCallbackCache setCachePath:[NSString stringWithUTF8String:cachePath.c_str()]];
    _pluginDelegates = [[NSPointerArray weakObjectsPointerArray] retain];
  }
  return self;
}

- (BOOL)application:(UIApplication*)application
    didFinishLaunchingWithOptions:(NSDictionary*)launchOptions {
  for (id<FlutterPlugin> plugin in [_pluginDelegates allObjects]) {
    if (!plugin) {
      continue;
    }
    ...
  }
  return YES;
}

- (BOOL)application:(UIApplication*)application
    willFinishLaunchingWithOptions:(NSDictionary*)launchOptions {
  blink::DartCallbackCache::LoadCacheFromDisk();
  for (id<FlutterPlugin> plugin in [_pluginDelegates allObjects]) {
    if (!plugin) {
      continue;
    }
    ...
  }
  return YES;
}
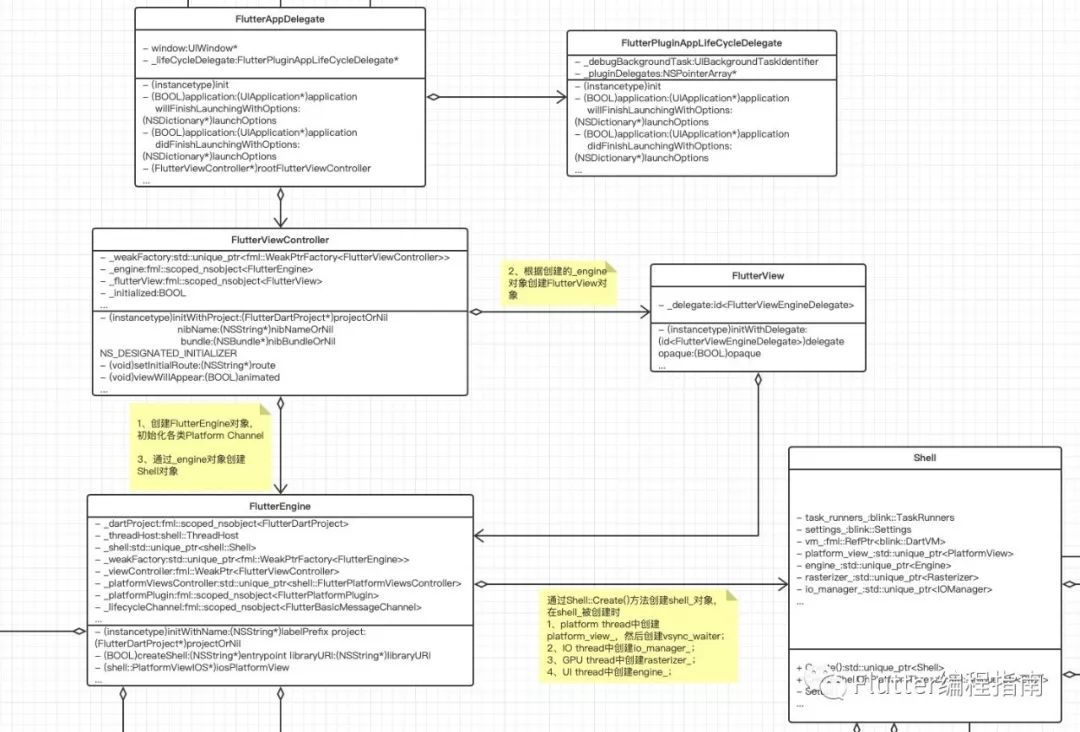
初始化方法中会获取一个缓存目录,并设置到FlutterCallbackCache中。而两个生命周期代理方法中会遍历_pluginDelegates中的对象,但此时数组中还没有信息。 接下来我们看下Main.storyboard会发现应用的rootViewController为FlutterViewController,那我们来看一下FlutterViewController的初始化和生命周期方法
- /flutter/shell/platform/darwin/ios/framework/Source/FlutterViewController.mm
- (instancetype)initWithProject:(FlutterDartProject*)projectOrNil
                        nibName:(NSString*)nibNameOrNil
                         bundle:(NSBundle*)nibBundleOrNil {
  self = [super initWithNibName:nibNameOrNil bundle:nibBundleOrNil];
  if (self) {
    _viewOpaque = YES;
    _weakFactory = std::make_unique<fml::WeakPtrFactory<FlutterViewController>>(self);
    _engine.reset([[FlutterEngine alloc] initWithName:@"io.flutter"
                                              project:projectOrNil
                               allowHeadlessExecution:NO]);
    _flutterView.reset([[FlutterView alloc] initWithDelegate:_engine opaque:self.isViewOpaque]);
    [_engine.get() createShell:nil libraryURI:nil];
    _engineNeedsLaunch = YES;
    [self loadDefaultSplashScreenView];
    [self performCommonViewControllerInitialization];
  }

  return self;
}
初始化方法中会创建FlutterEngine对象、FlutterView对象,并根据FlutterEngine对象创建Shell对象,我们先看下FlutterEngine对象的创建
- /flutter/shell/platform/darwin/ios/framework/Source/FlutterEngine.mm
- (instancetype)initWithName:(NSString*)labelPrefix
                     project:(FlutterDartProject*)projectOrNil
      allowHeadlessExecution:(BOOL)allowHeadlessExecution {
  ...

  _allowHeadlessExecution = allowHeadlessExecution;
  _labelPrefix = [labelPrefix copy];

  _weakFactory = std::make_unique<fml::WeakPtrFactory<FlutterEngine>>(self);

  if (projectOrNil == nil)
    _dartProject.reset([[FlutterDartProject alloc] init]);
  else
    _dartProject.reset([projectOrNil retain]);

  _pluginPublications = [NSMutableDictionary new];
  _platformViewsController.reset(new shell::FlutterPlatformViewsController());

  [self setupChannels];

  return self;
}
此时传入的projectOrNil为nil,则会创建FlutterDartProject对象并保存到_dartProject中,FlutterDartProject初始化
- /flutter/shell/platform/darwin/ios/framework/Source/FlutterDartProject.mm
static blink::Settings DefaultSettingsForProcess(NSBundle* bundle = nil) {
  auto command_line = shell::CommandLineFromNSProcessInfo();

  NSBundle* mainBundle = [NSBundle mainBundle];
  NSBundle* engineBundle = [NSBundle bundleForClass:[FlutterViewController class]];

  ...

  auto settings = shell::SettingsFromCommandLine(command_line);

  settings.task_observer_add = [](intptr_t key, fml::closure callback) {
    fml::MessageLoop::GetCurrent().AddTaskObserver(key, std::move(callback));
  };

  settings.task_observer_remove = [](intptr_t key) {
    fml::MessageLoop::GetCurrent().RemoveTaskObserver(key);
  };

  ...

  return settings;
}

- (instancetype)init {
  return [self initWithPrecompiledDartBundle:nil];
}

- (instancetype)initWithPrecompiledDartBundle:(NSBundle*)bundle {
  self = [super init];

  if (self) {
    _precompiledDartBundle.reset([bundle retain]);
    _settings = DefaultSettingsForProcess(bundle);
  }

  return self;
}
初始化方法中会调用c++代码方法DefaultSettingsForProcess来完成_settings对象的初始化,主要是各种flutter资源路径设置(国际化库、framework库等)和一些其他后续需要的信息配置。
然后回到FlutterEngine初始化方法中,继续完成各种platform channel的创建。
接着看下FlutterView对象的创建
- /flutter/shell/platform/darwin/ios/framework/Source/FlutterView.mm
- (instancetype)initWithDelegate:(id<FlutterViewEngineDelegate>)delegate opaque:(BOOL)opaque {
  FML_DCHECK(delegate) << "Delegate must not be nil.";
  self = [super initWithFrame:CGRectNull];

  if (self) {
    _delegate = delegate;
    self.layer.opaque = opaque;
  }

  return self;
}
做了很少的事情,主要是传入并持有实现了FlutterViewEngineDelegate协议的FlutterEngine对象。最后看下Shell的创建
- /flutter/shell/platform/darwin/ios/framework/Source/FlutterEngine.mm
- (BOOL)createShell:(NSString*)entrypoint libraryURI:(NSString*)libraryURI {
  ...

  static size_t shellCount = 1;
  auto settings = [_dartProject.get() settings];

  if (libraryURI) {
    ...
  } else if (entrypoint) {
    ...
  } else {
    settings.advisory_script_entrypoint = std::string("main");
    settings.advisory_script_uri = std::string("main.dart");
  }

  const auto threadLabel = [NSString stringWithFormat:@"%@.%zu", _labelPrefix, shellCount++];

  fml::MessageLoop::EnsureInitializedForCurrentThread();

  _threadHost = {
      threadLabel.UTF8String,  // label
      shell::ThreadHost::Type::UI | shell::ThreadHost::Type::GPU | shell::ThreadHost::Type::IO};

  shell::Shell::CreateCallback<shell::PlatformView> on_create_platform_view =
      [](shell::Shell& shell) {
        return std::make_unique<shell::PlatformViewIOS>(shell, shell.GetTaskRunners());
      };

  shell::Shell::CreateCallback<shell::Rasterizer> on_create_rasterizer = [](shell::Shell& shell) {
    return std::make_unique<shell::Rasterizer>(shell.GetTaskRunners());
  };

  if (shell::IsIosEmbeddedViewsPreviewEnabled()) {
    ...
  } else {
    blink::TaskRunners task_runners(threadLabel.UTF8String,                          // label
                                    fml::MessageLoop::GetCurrent().GetTaskRunner(),  // platform
                                    _threadHost.gpu_thread->GetTaskRunner(),         // gpu
                                    _threadHost.ui_thread->GetTaskRunner(),          // ui
                                    _threadHost.io_thread->GetTaskRunner()           // io
    );
    // Create the shell. This is a blocking operation.
    _shell = shell::Shell::Create(std::move(task_runners),  // task runners
                                  std::move(settings),      // settings
                                  on_create_platform_view,  // platform view creation
                                  on_create_rasterizer      // rasterzier creation
    );
  }
  ...
  return _shell != nullptr;
}该方法的实现和安卓中的AndroidShellHolder构造方法实现类似,主要新创建了三个线程gpu_thread、ui_thread和io_thread,加上平台的UI线程作为platform_thread一共四个关键线程。线程的作用可以参考安卓中的说明。然后会通过Shell::Create()方法创建engine层的Shell对象,后边的engine初始化、DartVM初始化和其他一系列对象创建都和安卓上面分析的一样了,这里不再赘述。
回过头来看一下FlutterViewController中初始化方法,上面一系列操作执行后,会进行各种必要的通知注册,以便接收到通知后做出响应。
至此FlutterViewController的初始化就完成了,我们可以看出整个的初始化就是对flutter engine的初始化,那么iOS平台dart层代码是在哪一步执行的呢,我们下面看一下FlutterViewController的生命周期方法viewWillAppear方法
- /flutter/shell/platform/darwin/ios/framework/Source/FlutterViewController.mm
- (void)viewWillAppear:(BOOL)animated {
  TRACE_EVENT0("flutter", "viewWillAppear");

  if (_engineNeedsLaunch) {
    [_engine.get() launchEngine:nil libraryURI:nil];
    _engineNeedsLaunch = NO;
  }
  [_engine.get() setViewController:self];

  if (_viewportMetrics.physical_width)
    [self surfaceUpdated:YES];
  [[_engine.get() lifecycleChannel] sendMessage:@"AppLifecycleState.inactive"];

  [super viewWillAppear:animated];
}这里engineNeedsLaunch在FlutterViewController初始化的时候被设置为YES,则会通过engine开始启动引擎
- /flutter/shell/platform/darwin/ios/framework/Source/FlutterEngine.mm
- (void)launchEngine:(NSString*)entrypoint libraryURI:(NSString*)libraryOrNil {
  // Launch the Dart application with the inferred run configuration.
  self.shell.GetTaskRunners().GetUITaskRunner()->PostTask(fml::MakeCopyable(
      [engine = _shell->GetEngine(),
       config = [_dartProject.get() runConfigurationForEntrypoint:entrypoint
                                                     libraryOrNil:libraryOrNil]  //
  ]() mutable {
        if (engine) {
          auto result = engine->Run(std::move(config));
          if (result == shell::Engine::RunStatus::Failure) {
            FML_LOG(ERROR) << "Could not launch engine with configuration.";
          }
        }
      }));
}
这里engine运行dart层代码是通过UITaskRunner在UI Thread中执行的,该方法和安卓Embedder层AndroidShellHolder的Launch方法功能相同。不过我们发现该方法两个参数都为nil,而安卓中的entrypoint为"main",那么iOS中最终是如何执行Dart应用程序执行main()方法的呢,我们看下RunConfiguration类的声明中一些变量的声明
- /flutter/shell/common/run_configuration.cc
class RunConfiguration {
 public:
  ...

  RunConfiguration(RunConfiguration&&);

  ~RunConfiguration();

  ...

  const std::string& GetEntrypoint() const;

  const std::string& GetEntrypointLibrary() const;
  ...

 private:
  ...
  std::string entrypoint_ = "main";
  std::string entrypoint_library_ = "";

  FML_DISALLOW_COPY_AND_ASSIGN(RunConfiguration);
}
结果我们发现RunConfiguration对象创建时默认entrypoint即为"main",所以不用主动设置entrypoint,最终Dart代码执行时就会将main()方法作为入口函数执行。后续的一些engine层的操作和安卓一样了,这里也不再赘述。
这个阶段关键objective-c和c++类的UML类图
