Android系统Launcher启动流程
Launcher程序就是我们平时看到的桌面程序,它其实也是一个android应用程序,只不过这个应用程序是系统默认第一个启动的应用程序,这里我们就简单的分析一下Launcher应用的启动流程。
不同的手机厂商定制android操作系统的时候都会更改Launcher的源代码,我们这里以android23的源码为例大致的分析一下Launcher的启动流程。
通过上一篇文章,我们知道SystemServer进程主要用于启动系统的各种服务,二者其中就包含了负责启动Launcher的服务,LauncherAppService。具体关于SystenServer的启动流程可以参见: android源码解析之(九)-->SystemServer进程启动流程
在SystemServer进程的启动过程中会调用其main静态方法,开始执行整个SystemServer的启动流程,在其中通过调用三个内部方法分别启动boot service、core service和other service。在调用startOtherService方法中就会通过调用mActivityManagerService.systemReady()方法,那么我们看一下其具体实现:
// We now tell the activity manager it is okay to run third party
        // code.  It will call back into us once it has gotten to the state
        // where third party code can really run (but before it has actually
        // started launching the initial applications), for us to complete our
        // initialization.
        mActivityManagerService.systemReady(new Runnable() {
            @Override
            public void run() {
                Slog.i(TAG, "Making services ready");
                mSystemServiceManager.startBootPhase(
                        SystemService.PHASE_ACTIVITY_MANAGER_READY);

                try {
                    mActivityManagerService.startObservingNativeCrashes();
                } catch (Throwable e) {
                    reportWtf("observing native crashes", e);
                }

                Slog.i(TAG, "WebViewFactory preparation");
                WebViewFactory.prepareWebViewInSystemServer();

                try {
                    startSystemUi(context);
                } catch (Throwable e) {
                    reportWtf("starting System UI", e);
                }
                try {
                    if (networkScoreF != null) networkScoreF.systemReady();
                } catch (Throwable e) {
                    reportWtf("making Network Score Service ready", e);
                }
                try {
                    if (networkManagementF != null) networkManagementF.systemReady();
                } catch (Throwable e) {
                    reportWtf("making Network Managment Service ready", e);
                }
                try {
                    if (networkStatsF != null) networkStatsF.systemReady();
                } catch (Throwable e) {
                    reportWtf("making Network Stats Service ready", e);
                }
                try {
                    if (networkPolicyF != null) networkPolicyF.systemReady();
                } catch (Throwable e) {
                    reportWtf("making Network Policy Service ready", e);
                }
                try {
                    if (connectivityF != null) connectivityF.systemReady();
                } catch (Throwable e) {
                    reportWtf("making Connectivity Service ready", e);
                }
                try {
                    if (audioServiceF != null) audioServiceF.systemReady();
                } catch (Throwable e) {
                    reportWtf("Notifying AudioService running", e);
                }
                Watchdog.getInstance().start();

                // It is now okay to let the various system services start their
                // third party code...
                mSystemServiceManager.startBootPhase(
                        SystemService.PHASE_THIRD_PARTY_APPS_CAN_START);

                try {
                    if (wallpaperF != null) wallpaperF.systemRunning();
                } catch (Throwable e) {
                    reportWtf("Notifying WallpaperService running", e);
                }
                try {
                    if (immF != null) immF.systemRunning(statusBarF);
                } catch (Throwable e) {
                    reportWtf("Notifying InputMethodService running", e);
                }
                try {
                    if (locationF != null) locationF.systemRunning();
                } catch (Throwable e) {
                    reportWtf("Notifying Location Service running", e);
                }
                try {
                    if (countryDetectorF != null) countryDetectorF.systemRunning();
                } catch (Throwable e) {
                    reportWtf("Notifying CountryDetectorService running", e);
                }
                try {
                    if (networkTimeUpdaterF != null) networkTimeUpdaterF.systemRunning();
                } catch (Throwable e) {
                    reportWtf("Notifying NetworkTimeService running", e);
                }
                try {
                    if (commonTimeMgmtServiceF != null) {
                        commonTimeMgmtServiceF.systemRunning();
                    }
                } catch (Throwable e) {
                    reportWtf("Notifying CommonTimeManagementService running", e);
                }
                try {
                    if (textServiceManagerServiceF != null)
                        textServiceManagerServiceF.systemRunning();
                } catch (Throwable e) {
                    reportWtf("Notifying TextServicesManagerService running", e);
                }
                try {
                    if (atlasF != null) atlasF.systemRunning();
                } catch (Throwable e) {
                    reportWtf("Notifying AssetAtlasService running", e);
                }
                try {
                    // TODO(BT) Pass parameter to input manager
                    if (inputManagerF != null) inputManagerF.systemRunning();
                } catch (Throwable e) {
                    reportWtf("Notifying InputManagerService running", e);
                }
                try {
                    if (telephonyRegistryF != null) telephonyRegistryF.systemRunning();
                } catch (Throwable e) {
                    reportWtf("Notifying TelephonyRegistry running", e);
                }
                try {
                    if (mediaRouterF != null) mediaRouterF.systemRunning();
                } catch (Throwable e) {
                    reportWtf("Notifying MediaRouterService running", e);
                }

                try {
                    if (mmsServiceF != null) mmsServiceF.systemRunning();
                } catch (Throwable e) {
                    reportWtf("Notifying MmsService running", e);
                }
            }
        });
可以发现这个方法传递了一个Runnable参数,里面执行了各种其他服务的systemReady方法,这里不是我们关注的重点,我们看一下在ActivityManagerService中systemReady方法的具体实现,方法体比较长,我就不在这里贴出代码了,主要的逻辑就是做一些ActivityManagerService的ready操作
public void systemReady(final Runnable goingCallback) {
        ...
        // Start up initial activity.
        mBooting = true;
        startHomeActivityLocked(mCurrentUserId, "systemReady");
        ...
    }
重点是在这个方法体中调用了startHomeActivityLocked方法,看其名字就是说开始执行启动homeActivity的操作,好了,既然如此,我们再看一下startHomeActivityLocked的具体实现:
boolean startHomeActivityLocked(int userId, String reason) {
        if (mFactoryTest == FactoryTest.FACTORY_TEST_LOW_LEVEL
                && mTopAction == null) {
            // We are running in factory test mode, but unable to find
            // the factory test app, so just sit around displaying the
            // error message and don't try to start anything.
            return false;
        }
        Intent intent = getHomeIntent();
        ActivityInfo aInfo =
            resolveActivityInfo(intent, STOCK_PM_FLAGS, userId);
        if (aInfo != null) {
            intent.setComponent(new ComponentName(
                    aInfo.applicationInfo.packageName, aInfo.name));
            // Don't do this if the home app is currently being
            // instrumented.
            aInfo = new ActivityInfo(aInfo);
            aInfo.applicationInfo = getAppInfoForUser(aInfo.applicationInfo, userId);
            ProcessRecord app = getProcessRecordLocked(aInfo.processName,
                    aInfo.applicationInfo.uid, true);
            if (app == null || app.instrumentationClass == null) {
                intent.setFlags(intent.getFlags() | Intent.FLAG_ACTIVITY_NEW_TASK);
                mStackSupervisor.startHomeActivity(intent, aInfo, reason);
            }
        }

        return true;
    }
首先是调用getHomeIntent()方法,看一下getHomeIntent是如何实现构造Intent对象的:
Intent getHomeIntent() {
        Intent intent = new Intent(mTopAction, mTopData != null ? Uri.parse(mTopData) : null);
        intent.setComponent(mTopComponent);
        if (mFactoryTest != FactoryTest.FACTORY_TEST_LOW_LEVEL) {
            intent.addCategory(Intent.CATEGORY_HOME);
        }
        return intent;
    }
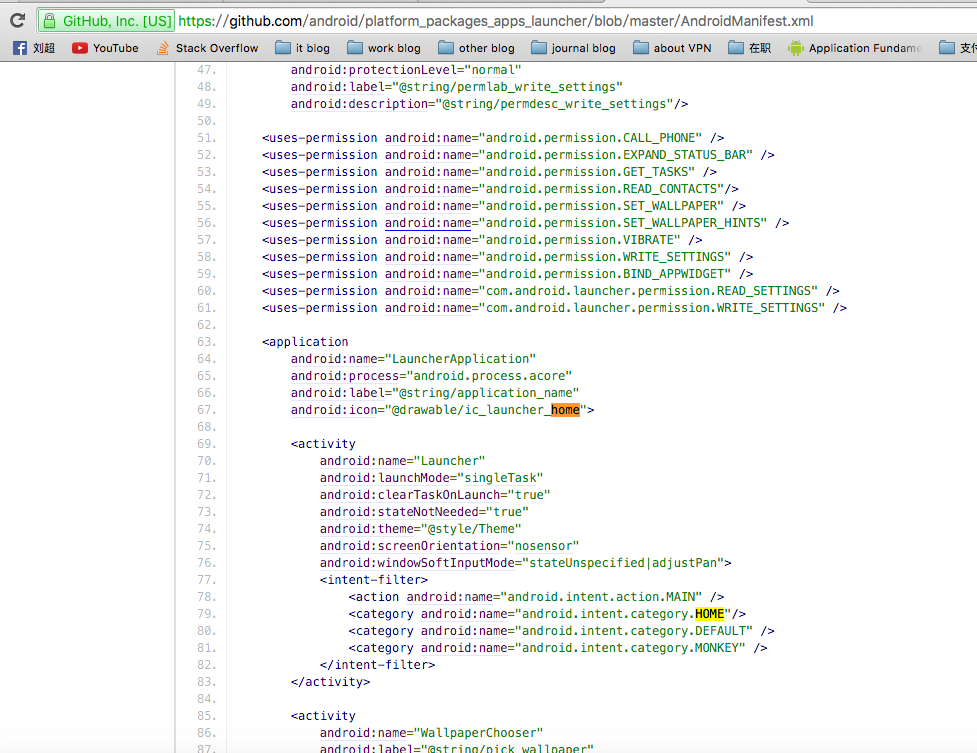
可以发现,启动Launcher的Intent对象中添加了Intent.CATEGORY_HOME常量,这个其实是一个launcher的标志,一般系统的启动页面Activity都会在androidmanifest.xml中配置这个标志。比如我们在github中的android launcher源码中查看其androidmanifest.xml文件:

继续回到我们的startHomeActivityLocked方法,我们发现经过一系列的判断逻辑之后最后调用了mStackSupervisor.startHomeActivity方法,然后我们可以查看一下该方法的具体实现逻辑:
void startHomeActivity(Intent intent, ActivityInfo aInfo, String reason) {
        moveHomeStackTaskToTop(HOME_ACTIVITY_TYPE, reason);
        startActivityLocked(null /* caller */, intent, null /* resolvedType */, aInfo,
                null /* voiceSession */, null /* voiceInteractor */, null /* resultTo */,
                null /* resultWho */, 0 /* requestCode */, 0 /* callingPid */, 0 /* callingUid */,
                null /* callingPackage */, 0 /* realCallingPid */, 0 /* realCallingUid */,
                0 /* startFlags */, null /* options */, false /* ignoreTargetSecurity */,
                false /* componentSpecified */,
                null /* outActivity */, null /* container */,  null /* inTask */);
        if (inResumeTopActivity) {
            // If we are in resume section already, home activity will be initialized, but not
            // resumed (to avoid recursive resume) and will stay that way until something pokes it
            // again. We need to schedule another resume.
            scheduleResumeTopActivities();
        }
    }
发现其调用的是scheduleResumeTopActivities()方法,这个方法其实是关于Activity的启动流程的逻辑了,这里我们不在详细的说明,关于Activity的启动流程我们在下面的文章中会介绍。
因为我们的Launcher启动的Intent是一个隐士的Intent,所以我们会启动在androidmanifest.xml中配置了相同catogory的activity,android M中配置的这个catogory就是LauncherActivity。
LauncherActivity继承与ListActivity,我们看一下其Layout布局文件:
<FrameLayout xmlns:android="http://schemas.android.com/apk/res/android"
    android:layout_width="match_parent"
    android:layout_height="match_parent"
    >

    <ListView
        android:id="@android:id/list"
        android:layout_width="match_parent"
        android:layout_height="match_parent"
        />

    <TextView
        android:id="@android:id/empty"
        android:layout_width="match_parent"
        android:layout_height="match_parent"
        android:gravity="center"
        android:text="@string/activity_list_empty"
        android:visibility="gone"
        android:textAppearance="?android:attr/textAppearanceMedium"
        />

</FrameLayout>
可以看到我们现实的桌面其实就是一个ListView控件,然后看一下其onCreate方法:
@Override
    protected void onCreate(Bundle icicle) {
        super.onCreate(icicle);

        mPackageManager = getPackageManager();

        if (!mPackageManager.hasSystemFeature(PackageManager.FEATURE_WATCH)) {
            requestWindowFeature(Window.FEATURE_INDETERMINATE_PROGRESS);
            setProgressBarIndeterminateVisibility(true);
        }
        onSetContentView();

        mIconResizer = new IconResizer();

        mIntent = new Intent(getTargetIntent());
        mIntent.setComponent(null);
        mAdapter = new ActivityAdapter(mIconResizer);

        setListAdapter(mAdapter);
        getListView().setTextFilterEnabled(true);

        updateAlertTitle();
        updateButtonText();

        if (!mPackageManager.hasSystemFeature(PackageManager.FEATURE_WATCH)) {
            setProgressBarIndeterminateVisibility(false);
        }
    }
可以看到在LauncherActivity的onCreate方法中初始化了一个PackageManager,其主要作用就是从中查询出系统所有已经安装的应用列表,应用包名,应用图标等信息。然后将这些信息注入到Adapter中,这样就可以将系统应用图标和名称显示出来了。 在系统的回调方法onListItemClick中
@Override
    protected void onListItemClick(ListView l, View v, int position, long id) {
        Intent intent = intentForPosition(position);
        startActivity(intent);
    }
这也就是为什么我们点击了某一个应用图标之后可以启动某一项应用的原因了,我们看一下这里的intentForPosition是如何实现的。
protected Intent intentForPosition(int position) {
        ActivityAdapter adapter = (ActivityAdapter) mAdapter;
        return adapter.intentForPosition(position);
    }
这里又调用了adapter的intentForPosition方法:
public Intent intentForPosition(int position) {
            if (mActivitiesList == null) {
                return null;
            }

            Intent intent = new Intent(mIntent);
            ListItem item = mActivitiesList.get(position);
            intent.setClassName(item.packageName, item.className);
            if (item.extras != null) {
                intent.putExtras(item.extras);
            }
            return intent;
        }
可以看到由于adapter的每一项中都保存了应用的包名可启动Activity名称,所以这里在初始化Intent的时候,直接将这些信息注入到Intent中,然后调用startActivity,就将这些应用启动了(关于startActivity是如何启动的下面的文章中我将介绍)。
总结:
Launcher的启动流程
-
Zygote进程 --> SystemServer进程 --> startOtherService方法 --> ActivityManagerService的systemReady方法 --> startHomeActivityLocked方法 --> ActivityStackSupervisor的startHomeActivity方法 --> 执行Activity的启动逻辑,执行scheduleResumeTopActivities()方法。。。。
- 因为是隐士的启动Activity,所以启动的Activity就是在AndroidManifest.xml中配置catogery的值为:
public static final String CATEGORY_HOME = "android.intent.category.HOME";可以发现android M中在androidManifest.xml中配置了这个catogory的activity是LauncherActivity,所以我们就可以将这个Launcher启动起来了
- LauncherActivity中是以ListView来显示我们的应用图标列表的,并且为每个Item保存了应用的包名和启动Activity类名,这样点击某一项应用图标的时候就可以根据应用包名和启动Activity名称启动我们的App了。