极简入门,Shiro的认证与授权流程解析
其实Shiro框架并不难,我梳理了一下,你只需要学会以下内容基本就足够了:
- 登陆、授权流程
- shiro过滤器链
- 整合Springboot、redis做共享会话
- 结合xxl-sso实现单点登录
接下来我会分为几篇文章分别去介绍,这篇我们先来了解一下shiro的一些基础知识,以及登录授权逻辑。
Shiro简介
在Web系统中我们经常要涉及到权限问题,例如不同角色的人登录系统,他操作的功能、按钮、菜单是各不相同的,这就是所谓的权限。
而构建一个互联网应用,权限校验管理是很重要的安全措施,这其中主要包含:
- 用户认证 - 用户身份识别,即登录
- 用户授权 - 访问控制
- 密码加密 - 加密敏感数据防止被偷窥
- 会话管理 - 与用户相关的时间敏感的状态信息
Shiro对以上功能都进行了很好的支持,它可以非常容易的开发出足够好的应用。Shiro可以帮助我们完成:认证、授权、加密、会话管理、与Web集成、缓存等。而且Shiro的API也是非常简单。
官方源码:https://github.com/apache/shiro
整体结构与重要组件
从上图可以看出,Security Manager是Shiro的核心管理器,认证授权会话缓存等都是在其内部完成,然后会委托给具体的组件来处理,比如认证过程委托给Authenticator,授权委托给Authorizer组件。所以,整理还是比较清晰,源代码也容易追踪。
我们来具体聊聊所有的组件:
Subject:主体,可以看到主体可以是任何可以与应用交互的“用户”;
SecurityManager:Shiro的心脏;所有具体的交互都通过SecurityManager进行控制;负责所有Subject、且负责进行认证和授权、及会话、缓存的管理。
- Authenticator:认证器,判断用户是否正常登陆
-
Authorizer:授权器,判断用户是否有权限操作资源
- Realm:可以有1个或多个Realm,主要提供认证和授权的数据;
- Session:Shiro提供一个权限的企业级Session解决方案,session的生命周期都在SessionManager中进行管理。
- SessionManager:shiro的会话管理器;
- SessionDAO:用于会话的CRUD,比如存储到ehcache或者redis中的会话增删改查;
- CacheManager:缓存控制器,来管理如用户、角色、权限等的缓存的;因为这些数据基本上很少去改变,放到缓存中后可以提高访问的性能
- Cryptography:密码模块,Shiro提高了一些常见的加密组件用于如密码加密/解密的。
官方简单示例
官网例子:http://shiro.apache.org/tutorial.html
刚入门Shiro的同学,真的需要去看看这个官方例子,你可以更加深入了解Shiro的权限校验流程。我还是贴一下代码吧,一些同学比较懒:
- shiro.ini
# -----------------------------------------------------------------------------

# Users and their (optional) assigned roles

# username = password, role1, role2, ..., roleN

# -----------------------------------------------------------------------------

[users]

root = secret, admin

guest = guest, guest

presidentskroob = 12345, president

darkhelmet = ludicrousspeed, darklord, schwartz

lonestarr = vespa, goodguy, schwartz

# -----------------------------------------------------------------------------

# Roles with assigned permissions

# roleName = perm1, perm2, ..., permN

# -----------------------------------------------------------------------------

[roles]
admin = *
schwartz = lightsaber:*
goodguy = winnebago:drive:eagle5
上面代码中, root=secret,admin表示,用户名root,密码secret,角色是admin; schwartz=lightsaber:*表示角色schwartz拥有权限lightsaber:*。你其实可以把这个文件看成一个Realm,其实就是shiro默认的IniRealm。
- 测试类Tutorial
public class Tutorial {
    private static final transient Logger log = LoggerFactory.getLogger(Tutorial.class);

    public static void main(String[] args) {
        log.info("My First Apache Shiro Application");

        Factory<SecurityManager> factory = new IniSecurityManagerFactory("classpath:shiro.ini");
        SecurityManager securityManager = factory.getInstance();
        SecurityUtils.setSecurityManager(securityManager);

        // get the currently executing user:

        Subject currentUser = SecurityUtils.getSubject();

        // Do some stuff with a Session (no need for a web or EJB container!!!)

        Session session = currentUser.getSession();

        session.setAttribute("someKey", "aValue");

        String value = (String) session.getAttribute("someKey");

        if (value.equals("aValue")) {

            log.info("Retrieved the correct value! [" + value + "]");

        }

        // let's login the current user so we can check against roles and permissions:

        if (!currentUser.isAuthenticated()) {

            UsernamePasswordToken token = new UsernamePasswordToken("lonestarr", "vespa");

            token.setRememberMe(true);

            try {

                currentUser.login(token);

            } catch (UnknownAccountException uae) {

                log.info("There is no user with username of " + token.getPrincipal());

            } catch (IncorrectCredentialsException ice) {

                log.info("Password for account " + token.getPrincipal() + " was incorrect!");

            } catch (LockedAccountException lae) {

                log.info("The account for username " + token.getPrincipal() + " is locked.  " +

                        "Please contact your administrator to unlock it.");

            }

            // ... catch more exceptions here (maybe custom ones specific to your application?

            catch (AuthenticationException ae) {

                //unexpected condition?  error?

            }

        }

        //say who they are:

        //print their identifying principal (in this case, a username):

        log.info("User [" + currentUser.getPrincipal() + "] logged in successfully.");

        //test a role:

        if (currentUser.hasRole("schwartz")) {

            log.info("May the Schwartz be with you!");

        } else {

            log.info("Hello, mere mortal.");

        }

        //test a typed permission (not instance-level)

        if (currentUser.isPermitted("lightsaber:wield")) {

            log.info("You may use a lightsaber ring.  Use it wisely.");

        } else {

            log.info("Sorry, lightsaber rings are for schwartz masters only.");

        }

        //a (very powerful) Instance Level permission:

        if (currentUser.isPermitted("winnebago:drive:eagle5")) {

            log.info("You are permitted to 'drive' the winnebago with license plate (id) 'eagle5'.  " +

                    "Here are the keys - have fun!");

        } else {

            log.info("Sorry, you aren't allowed to drive the 'eagle5' winnebago!");

        }

        //all done - log out!

        currentUser.logout();

        System.exit(0);

    }

}
从上面的实例中,我们可以总结一下常用的API:
常用API
#获取当前用户

Subject currentUser = SecurityUtils.getSubject();

#判断用户已经认证

currentUser.isAuthenticated()

#用户登录凭证

UsernamePasswordToken token = new UsernamePasswordToken("lonestarr", "vespa");

#记住我

token.setRememberMe(true);

#登陆校验

currentUser.login(token);

#判断是否有角色权限

currentUser.hasRole("schwartz")

#判断是否有资源操作权限

currentUser.isPermitted("lightsaber:wield")

#登出

currentUser.logout();
其实稍微梳理一下,可以发现上面代码主要有两个步骤:
- 认证:
UsernamePasswordToken token = new UsernamePasswordToken("lonestarr", "vespa");

currentUser.login(token);

currentUser.logout();
- 判断权限
currentUser.hasRole("schwartz")

currentUser.isPermitted("winnebago:drive:eagle5")
接下来,我们去探讨一下shiro的认证与授权流程,并从源码层去解析一下shiro各个组件之间的关系。
认证流程
上面图片中,根据序号,其实我们大概能猜出里shiro的认证流程:
- Subject进行login操作,参数是封装了用户信息的token
- Security Manager进行登录操作
- Security Manager委托给Authenticator进行认证逻辑处理
- 调用AuthenticationStrategy进行多Realm身份验证
- 调用对应Realm进行登录校验,认证成功则返回用户属性,失败则抛出对应异常
我们从login方法开始debug一下流程,用简要方式追踪shiro源码的认证逻辑:
currentUser.login(token);

|

Subject subject = this.securityManager.login(this, token);

|

AuthenticationInfo info = this.authenticate(token);

|

this.authenticator.authenticate(token);

|

AuthenticationInfo info = this.doAuthenticate(token);

|

Collection<Realm> realms = this.getRealms();

doSingleRealmAuthentication(realm, token);

|

AuthenticationInfo info = realm.getAuthenticationInfo(token);

|

AuthenticationInfo info = realm.doGetAuthenticationInfo(token);
ok,一条线下来,从login到委托给authenticator,再最后调用realm的doGetAuthenticationInfo方法。
所以,从源码上来看,如果要实现shiro的认证逻辑,至少要准备一个Realm组件、和初始化securityManager组件。
常见异常
-
DisabledAccountException(禁用的帐号)
-
LockedAccountException(锁定的帐号)
-
UnknownAccountException(错误的帐号)
-
ExcessiveAttemptsException(登录失败次数过多)
-
IncorrectCredentialsException (错误的凭证)
- ExpiredCredentialsException(过期的凭证)
授权流程
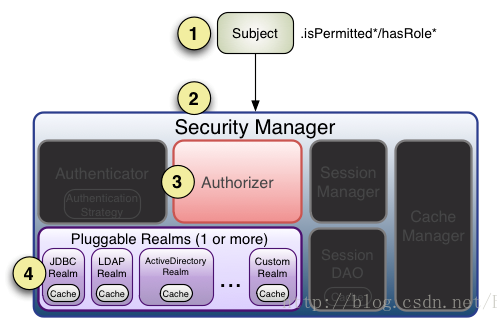
从上图中,我们可以知道授权流程如下:
- 调用Subject.isPermitted/hasRole接口
- 委托给SecurityManager
- 而SecurityManager接着会委托给Authorizer
- Authorizer会判断Realm的角色/权限是否和传入的匹配
- 匹配如isPermitted/hasRole会返回true,否则返回false表示授权失败
追踪一下源码如下:
currentUser.hasRole("schwartz")

|

this.securityManager.hasRole(this.getPrincipals(), roleIdentifier)

|

this.authorizer.hasRole(principals, roleIdentifier)

|

AuthorizationInfo info = this.getAuthorizationInfo(principal);

return info.getRoles().contains(roleIdentifier)

|

info = this.doGetAuthorizationInfo(principals);(realm)
所以shiro判断用户是否有权限首先会从realm中获取用户所拥有的权限角色信息,然后再匹配当前的角色或权限是否包含,从而判定用户是否有权限!
说到权限,很多人自然会想起权限系统,涉及到几个关键对象:
-
主体(Subject)
-
资源(Resource)
-
权限(Permission)
- 角色(Role)
通过这几个要素,可以设计出比较合理的权限系统。
Shiro常见3种授权判断方式:
- 编码实现
Subject subject = SecurityUtils.getSubject();

if(subject.hasRole(“admin”)) {

    //有权限

} else {

    //无权限

}
- 注解实现
@RequiresRoles("admin")

public void hello() {

    //有权限

}
- JSP Taglig实现,freemarker等类似
<shiro:hasRole name="admin">

<!— 有权限 —>

</shiro:hasRole>
jsp页面引入shiro标签
<%@ taglib prefix="shiro" uri="http://shiro.apache.org/tags"%>
在线会话管理
获取当前会话总人数
@Autowired

private SessionDAO sessionDAO;

//获取会话数量

int size = sessionDAO.getActiveSessions().size()
强制下线
//强制退出
Session session = sessionDAO.readSession(subject.getSession().getId());

sessionDAO.delete(session);

// logout,可作为强制退出

subject.logout();
Assert.isTrue(!subject.isAuthenticated());
结束语
ok,感觉是高度极简的一篇文章,主要把重要的组件和登录、授权几个流程搞清楚之后,其实shiro基本已经学会了,后面我们再学一下shiro的几个主要内置过滤器怎么使用,如何集成SpringBoot,基本就差不多了。


