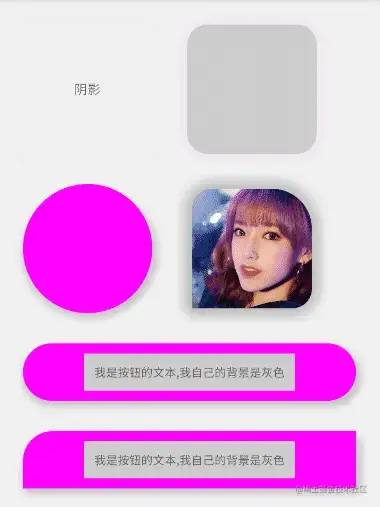
Android阴影实现的几种方案
圆角容器?自定义圆角容器?自定义圆角加阴影容器?
太难了,不知道大家有没有同款UI设计师,非常喜欢圆角,还喜欢异形的圆角,特别喜欢顶部圆角或者左上角圆角。
之前在面向UI设计师开发一篇文章中,我们已经对一些异形圆角做了自定义的处理,可是现在需求升级了。
https://juejin.cn/post/7145267096577343502
异形圆角都不能满足了,现在还得自带特殊的阴影效果才能实现他们高大的设计。
Android的阴影可没有H5的阴影效果那么好搞哦,先一起看看Android都有哪些方式设置阴影。
Android阴影绘制的几种方式
1. 点9图
其实这个方案是最好的方案,使用起来简单,只要圆角能保证和设计一致,可以完美的复刻效果图。
缺点是如果不同形状的点9图多了之后会占用更大的空间,如果不同的圆角,就需要不同的点9图,不如自己写的好维护,每次阴影都需要去找UI。并且圆角的角度不好调节,可能会不准确需要多次修改。
2. layer-list方案
layer-list就是一个drawable的集合,把多张drawable叠起来,看起来实现了阴影的效果。
<layer-list xmlns:android="http://schemas.android.com/apk/res/android">
    <!--阴影-->
    <item>
        <shape android:shape="rectangle">
            <solid android:color="#0F000000" />
            <corners android:radius="10dp" />
        </shape>
    </item>
    <!--前景-->
    <item
        android:bottom="1dp"
        android:left="1dp"
        android:right="1dp"
        android:top="1dp">
        <shape android:shape="rectangle">
            <solid android:color="@android:color/white"/>
            <corners android:radius="10dp" />
        </shape>
    </item>
</layer-list>
缺点是阴影没有晕染的效果,没有模糊的那种感觉,就算背景层使用渐变的效果来做,效果也是差强人意。
3. translationZ方案
5.0以后才能使用 elevation 这种方案,很明显的例如CardView,大家都知道,通过修改Z轴的值,可以实现不同的阴影效果,但是阴影的颜色不能修改。
如果想修改阴影的大小轮廓还需要配合OutlineProvider来修改。
而8.0之后才有 android:outlineSpotShadowColor 这个属性才能修改阴影的颜色。总的来说兼容性不太好,使用起来太麻烦。
4. 自定义View方案
不管是自定义View也还是自定义ViewGroup,都是一样的效果,我们都是通过Paint画笔自己画出阴影,本质都是操作onDraw方法。
核心类就是 BlurMaskFilter 类,它的兼容性比较好,它通过一个模糊的遮罩来实现几个重要参数:
- mMaskRadius:扩散的半径
- BlurMaskFilter.Blur.NORMAL:整个图像都被模糊掉
- BlurMaskFilter.Blur.SOLID:图像边界外产生一层与图像颜色一致阴影效果
- BlurMaskFilter.Blur.OUTER:图像边界外产生一层阴影,并且将图像变成透明效果
- BlurMaskFilter.Blur.INNER:在图像内部边沿产生模糊效果
由于文本是对自定义圆角的封装,所以我们就在此自定义View的方案上继续完善。
自定义圆角ViewGroup中加入阴影
之前我们已经定义好了自定义圆角的ViewGroup容器,我们是通过Paint自己绘制的。这不是巧了吗!我们通过另一个阴影的Paint去添加 setMaskFilter 不就可以实现阴影效果了吗?
唯一我们需要注意的就是控件大小与裁剪,与阴影的大小,内容的大小,处理好它们几个Rect绘制的范围就可以在圆角的布局里加上阴影的效果啦。
话不多说,我们开始加入我们需要的自定义属性
    <!-- 是否绘制圆形 -->
    <attr name="is_circle" format="boolean" />
    <!-- 绘制相同的圆角角度 -->
    <attr name="round_radius" format="dimension" />
    <!-- 绘制不同的圆角-左上角度 -->
    <attr name="topLeft" format="dimension" />
    <!-- 绘制不同的圆角-右上角度 -->
    <attr name="topRight" format="dimension" />
    <!-- 绘制不同的圆角-左下角度 -->
    <attr name="bottomLeft" format="dimension" />
    <!-- 绘制不同的圆角-右下角度 -->
    <attr name="bottomRight" format="dimension" />
    <!-- 绘制背景的颜色 -->
    <attr name="round_circle_background_color" format="color" />
    <!-- 绘制背景的图片 -->
    <attr name="round_circle_background_drawable" format="reference" />
    <!-- 绘制背景是否居中裁剪 -->
    <attr name="is_bg_center_crop" format="boolean" />
    <!-- 阴影大小 -->
    <attr name="round_circle_shadowSize" format="dimension" />
    <!-- 阴影颜色 -->
    <attr name="round_circle_shadowColor" format="color" />
    <!-- 阴影水平偏移 -->
    <attr name="round_circle_shadowOffsetX" format="dimension" />
    <!-- 阴影垂直偏移 -->
    <attr name="round_circle_shadowOffsetY" format="dimension" />
这里对属性的作用做了注释,很方便理解了。
接下来我们在基类中取出属性值
internal abstract class AbsRoundCirclePolicy(
    view: View,
    context: Context,
    attributeSet: AttributeSet?,
    attrs: IntArray,
    attrIndex: IntArray
) : IRoundCirclePolicy {

    ...
    var mShadowSize = 0
    var mShadowColor = 0
    var mShadowOffsetX = 0
    var mShadowOffsetY = 0

    private fun initialize(context: Context, attributeSet: AttributeSet?, attrs: IntArray, attrIndexs: IntArray) {
        val typedArray = context.obtainStyledAttributes(attributeSet, attrs)

        ...

        mShadowSize = typedArray.getDimensionPixelSize(attrIndexs[9], 0)
        mShadowColor = typedArray.getColor(attrIndexs[10], 0x10000000)
        mShadowOffsetX = typedArray.getDimensionPixelSize(attrIndexs[11], 0)
        mShadowOffsetY = typedArray.getDimensionPixelSize(attrIndexs[12], 0)
    }
}
然后我们在具体的策略裁剪类中拿到对应的值,内部我们需要在layout的时候去确定绘制内容的大小。
override fun onLayout(left: Int, top: Int, right: Int, bottom: Int) {
    setupRect()
    setupBG()
    setupShadow()
}
先确定内容的大小,阴影的大小,再初始化绘制对象,初始化阴影对象
//设置Rect
private fun setupRect() {
    val rectF = calculateBounds()
    val let: Float = rectF.left + mShadowSize
    val top: Float = rectF.top + mShadowSize
    val right: Float = rectF.right - mShadowSize
    val bottom: Float = rectF.bottom - mShadowSize

    mDrawableRect.set(let, top, right, bottom)

    //阴影的Rect
    val shadowLet: Float
    val shadowTop: Float
    val shadowRight: Float
    val shadowBottom: Float

    if (mShadowOffsetX > 0) {
        shadowLet = let + mShadowOffsetX
        shadowRight = right
    } else {
        shadowLet = let
        shadowRight = right + mShadowOffsetX
    }

    if (mShadowOffsetY > 0) {
        shadowTop = top + mShadowOffsetY
        shadowBottom = bottom
    } else {
        shadowTop = top
        shadowBottom = bottom + mShadowOffsetY
    }

    mShadowRect.set(shadowLet, shadowTop, shadowRight, shadowBottom)
}

//设置画笔和BitmapShader等
private fun setupBG() {

    if (mRoundBackgroundDrawable != null && mRoundBackgroundBitmap != null) {

        mBitmapWidth = mRoundBackgroundBitmap!!.width
        mBitmapHeight = mRoundBackgroundBitmap!!.height

        mBitmapShader = BitmapShader(mRoundBackgroundBitmap!!, Shader.TileMode.CLAMP, Shader.TileMode.CLAMP)

        if (mRoundBackgroundBitmap!!.width != 2) {
            updateShaderMatrix()
        }

        mBitmapPaint.isAntiAlias = true
        mBitmapPaint.shader = mBitmapShader

    }

}

//阴影的设置与绘制准备
private fun setupShadow() {
    if (mShadowSize > 0) {

        mShadowPaint.color = Color.TRANSPARENT
        mShadowPaint.style = Paint.Style.STROKE
        mShadowPaint.strokeWidth = (mShadowSize / 4).toFloat()

        // 如果阴影不带透明度,强制给它设置一点透明度
        if (ColorUtils.setAlphaComponent(mShadowColor, 255) == mShadowColor) {
            mShadowColor = ColorUtils.setAlphaComponent(mShadowColor, 254)
        }
        mShadowPaint.color = mShadowColor

        mShadowPaint.maskFilter = BlurMaskFilter(mShadowSize / 1.2f, BlurMaskFilter.Blur.NORMAL)

    } else {
        mShadowPaint.clearShadowLayer()
    }
}
当我们全部的对象都初始化之后,总共是分两个步骤,一个是裁剪,一个是绘制,绘制又分背景内容的绘制和阴影的绘制。
在钩子函数中我们是在绘制完成之后再裁剪。
@TargetApi(Build.VERSION_CODES.LOLLIPOP)
    override fun beforeDispatchDraw(canvas: Canvas?) {
        //5.0版本以上,采用ViewOutlineProvider来裁剪view
        mContainer.clipToOutline = true
    }

    @TargetApi(Build.VERSION_CODES.LOLLIPOP)
    override fun afterDispatchDraw(canvas: Canvas?) {
        //5.0版本以上,采用ViewOutlineProvider来裁剪view
        mContainer.outlineProvider = object : ViewOutlineProvider() {
            override fun getOutline(view: View, outline: Outline) {

                if (isCircleType) {
                    //如果是圆形裁剪圆形
                    val bounds = Rect()
                    calculateBounds().roundOut(bounds)
                    outline.setRoundRect(bounds, bounds.width() / 2.0f)

                } else {
                    //如果是圆角-裁剪圆角
                    if (mTopLeft > 0 || mTopRight > 0 || mBottomLeft > 0 || mBottomRight > 0) {
                        //如果是单独的圆角
                        val path = Path()
                        path.addRoundRect(
                            calculateBounds(),
                            floatArrayOf(mTopLeft, mTopLeft, mTopRight, mTopRight, mBottomRight, mBottomRight, mBottomLeft, mBottomLeft),
                            Path.Direction.CCW
                        )

                        //不支持2阶的曲线
                        outline.setConvexPath(path)

                    } else {
                        //如果是统一圆角
                        outline.setRoundRect(0, 0, mContainer.width, mContainer.height, mRoundRadius)
                    }

                }
            }
        }
    }
而绘制则是在我们onDraw的钩子函数中实现,需要注意的是我们需要先绘制阴影再绘制内容,这样才能实现阴影在底部的效果。
   override fun onDraw(canvas: Canvas?): Boolean {
        if (isCircleType) {

            if (mShadowSize > 0) {
                //阴影的绘制
                canvas?.drawOval(mShadowRect, mShadowPaint)
            }

            //绘制圆角背景图
            canvas?.drawCircle(
                mDrawableRect.centerX(), mDrawableRect.centerY(),
                Math.min(mDrawableRect.height() / 2.0f, mDrawableRect.width() / 2.0f), mBitmapPaint
            )

        } else {
            //自定义圆角
            if (mTopLeft > 0 || mTopRight > 0 || mBottomLeft > 0 || mBottomRight > 0) {

                if (mShadowSize > 0) {
                    //阴影的绘制
                    mShadowPath.reset()
                    mShadowPath.addRoundRect(
                        mShadowRect, floatArrayOf(mTopLeft, mTopLeft, mTopRight, mTopRight, mBottomRight, mBottomRight, mBottomLeft, mBottomLeft),
                        Path.Direction.CW
                    )
                    canvas?.drawPath(mShadowPath, mShadowPaint)
                }

                //使用单独的圆角背景
                val path = Path()
                path.addRoundRect(
                    mDrawableRect, floatArrayOf(mTopLeft, mTopLeft, mTopRight, mTopRight, mBottomRight, mBottomRight, mBottomLeft, mBottomLeft),
                    Path.Direction.CW
                )
                canvas?.drawPath(path, mBitmapPaint)

            } else {
                //统一圆角
                if (mShadowSize > 0) {
                    //阴影的绘制
                    canvas?.drawRoundRect(mShadowRect, mRoundRadius, mRoundRadius, mShadowPaint)
                }

                //使用统一的圆角背景
                canvas?.drawRoundRect(mDrawableRect, mRoundRadius, mRoundRadius, mBitmapPaint)

            }
        }

        //是否需要super再绘制
        return true
    }
这样我们就在之前的基础上实现了阴影的效果。
这样就可以自定义阴影颜色,偏移值等效果了。
总结
自定义的效果并不只限于这种圆角的容器,其实只要掌握了这样的思路,我们可以用于其他的自有的一些自定义View中。
我比较推荐的两种阴影实现方式就是自定义View和点9图,只要是有规律的阴影基本上都可以使用自定义View的方案,如果是非常规的阴影效果,那也只能使用点9图了。
好了本文的全部代码与Demo都已经开源。有兴趣可以看这里,可供大家参考学习。https://gitee.com/newki123456/RoundCircleLayout
如果想在项目中直接使用,我已经上传到 MavenCentral ,使用直接依赖即可。
implementation "com.gitee.newki123456:round_circle_layout:1.0.1"
惯例,我如有讲解不到位或错漏的地方,希望同学们可以指出交流。
如果感觉本文对你有一点点的启发,还望你能点赞支持一下,你的支持是我最大的动力。关注我获取更多知识或者投稿
