如何实现一个Canvas渲染引擎(一):节点和层级关系
1 为什么要实现节点和层级关系
1.1 Canvas相较于DOM
- DOM提供了十分便利的web页面开发效率,其提供了各种各样的强大功能,我们通过几行CSS代码就可以设置节点的样式以及节点的各种定位方式(相对定位,绝对定位,display:flex,display:grid等),DOM还主动提供了层级关系的概念,我们可以给节点添加子节点(appendChild),然后子节点会随着父节点的位置或大小的改变而改变,通过z-index来决定哪些节点应该放在顶部。总之,DOM提供了许多开箱即用的能力,而这些,都是canvas没有的。
- canvas只提供了比较底层的能力,如:画圆,画线等这种简单的能力,也正是因为canvas比较底层,所以它的性能相较于DOM要高上许多,如果要进行大量节点的渲染,canvas的性能显而易见地比DOM高。
1.2 Canvas开发的难点
- canvas并不会主动维护一个层级关系,我们能做的事情,只有画圆、画矩形、画线等,至于像DOM那样,在一个节点上调用appendChild来给这个节点添加子节点这种事情,在canvas里是不存在的,canvas根本就没有所谓的「元素(或者说是节点)」 这个概念,更没有所谓的「层级关系」的概念,canvas开发注定不能像DOM那样方便,随意地在节点上添加子节点,或者删除子节点,以及让节点成「组」。
- 我们肯定不希望用这么底层的API进行业务开发的,想象一下,我现在画了一个图形A,这个图形A包含若干个子图形,现在我想让这个图形A旋转90度,注意,是作为一个「整体」旋转90度,要保证各个子图形之间的相对位置不变,也就是让这一系列的子图形成一个「组」,我需要分别计算每一个子图形旋转90度的位置,而且为了保证旋转后这些子图形的相对位置保持不变,我需要设置一个旋转的锚点,也就是图形A的左上角,以上的步骤是非常繁琐的,作为业务开发,我不希望这么麻烦,我希望的是只需要调用一个API(就像element.style.transform='rotate(90deg)')就能完成这件事了,然后剩下的事情交给渲染引擎来做就行了。
1.3 在Canvas中实现节点和层级关系的优点
- canvas提供的API非常底层,并不适合业务开发,实现层级关系能让开发更加便利,而无需过于关注底层。
- 注意,我们并不需要实现DOM那么复杂的层级关系(position:absolute、position:fixed、display:flex、display:grid),我们只需要维护一个比较简单的层级关系就够了,在保证canvas高性能的前提下,同时保证一定的开发效率。
2 具体要实现哪些东西
我们要实现的节点和层级关系,会参照DOM的节点和层级关系来做,但不会完全实现DOM的那套东西,因为实在是太复杂了,我们只需要实现一部分核心的逻辑就能够满足我们使用了。
2.1 节点
- 我们会在canvas中实现类似DOM节点的概念,用简单的API修改节点的某些属性,就可以在页面上直接看到效果,就像操作DOM一样。
2.2 父节点与子节点之间的层级关系
- 如同DOM树一样,我们要实现的渲染引擎里,父节点和子节点之间也会形成一棵树状结构。
- 在DOM里,子节点不一定参照父节点来进行定位,而是可能有多种定位方式,(position:fixd,position:absolute,position:static等),「但是在我们要实现的渲染引擎里,我们不需要实现那么复杂的定位,让子节点完全依赖父节点来进行定位就OK了(类似于position:static)」。
- 在DOM里,子节点一定会位于父节点的上面,我们要做的渲染引擎也是如此,具体实现方式是:「在执行渲染逻辑的时候,父节点会先被渲染出来,子节点在之后才会被渲染,这样就实现了子节点在父节点之上的效果」。
2.3 兄弟节点之间的层级关系
- 我们将会用一个数组来保存兄弟节点,和DOM类似,我们会实现一个z-index属性来控制哪些节点被放在顶层,哪些节点被放在下面。
- 我们只会在兄弟节点之间进行z-index的比较,而不会在祖先节点和子节点之间进行z-index的比较。
- 在执行渲染逻辑之前,我们会对这个数组进行排序,z-index越大的节点会被排在数组的越后面,这意味着z-index越大的节点会在越后面进行渲染,这样我们看到的效果就是z-index大的节点会被放在顶部。
2.4 ‘组’的概念
- 在DOM里,祖先节点和其包含的所有子节点会形成一个「组」,在对祖先节点进行旋转、平移、缩放时,其所有子节点也会旋转、平移、缩放,在这个渲染引擎里,我们要实现同样的效果。
2.5 锚点
- 锚点就类似于DOM的transform-origin属性,在旋转或者缩放的时候,锚点会固定不变。在canvas中,一切变换都是线性的变换,大家可以理解为:「在canvas中,缩放和旋转,都是将原点(canvas元素左上角)作为锚点来进行的」。这对于业务开发来说非常不便利,所以我们要实现类似于DOM的transform-origin属性,来提高效率。
3 细节实现
3.1 准备工作
到目前为止还没有任何代码,现在要开始写代码了,我们要先定义好一些以后会用到的类
3.1.1 DisplayObject
- 这个类代表了最原始的‘节点’的概念,所有可以被展示到canvas画布上的、各种类型的节点都会继承于这个类,这是一个抽象类,我们并不会直接实例化这个类。
- 这个类上面挂载了‘节点’的各种属性,比如:父元素、透明度、旋转角度、缩放、平移、节点是否可见等。
3.1.2 Container
- 这个类代表了‘组’的概念,它提供了添加子元素,移除子元素等的方法;后续的要被渲染的一些类(如Graphics,Text,Sprite等)会继承于这个类;这个类本身不会被渲染(因为它只是一个‘组’,它本身没有内容可以渲染)。
- 这个类继承于DisplayObject类,‘组’也算作‘节点’。
3.1.3 Graphics
- 这个类会用来构建一些几何图形元素;它会继承Container类。
3.1.4 Matrix和Transform
- 在渲染引擎中,一切变换(平移、旋转、缩放等)都会转化成变换矩阵(matrix),因为canvas只接受矩阵变换,虽然canvas为了开发的便捷,也提供了ctx.rotate,ctx.scale等操作,但是canvas中的这些操作会直接转换成变换矩阵,而不像DOM那样,有锚点的概念,所以canvas提供的rotate,scale等操作,和DOM提供的rotate,scale的表现是不一样的。
- Matrix类将会提供各种各样的与矩阵操作相关的函数(矩阵相乘,矩阵求逆等),任何变换的叠加都将会转换成matrix,方便我们调用canvas的指令。
- Transform类就类似CSS的transform,它提供了一些更清晰、更符合人类直觉的变换,而不用直接使用矩阵变换,当然,这些变换最终会转换成矩阵变换。
3.1.5 Application
- 这是渲染引擎的入口,将canvas元素等参数传给这个类,然后这个类就会启动渲染引擎,开始渲染。
- Application类的stage属性是一个Container,要把节点添加到stage上,渲染引擎才会渲染这些节点,stage是一切待渲染元素的祖先元素。
3.2 添加、删除子元素
实现层级关系的第一步,自然是在元素上添加、删除子元素
3.2.1 删除子元素Container.removeChild(child: Container)
public removeChild(child: Container) {
  for (let i = 0; i < this.children.length; i++) {
    if (this.children[i] === child) {
      this.children.splice(i, 1)
      return
    }
  }
}
3.2.2 添加子元素Container.addChild(child: Container)
public addChild(child: Container) {
  if (child.parent) {
    child.parent.removeChild(child) // 将要添加的child从它的父元素的children中移除
  }
  this.children.push(child)
  child.parent = this // 将要添加的child的parent指向this
  this.sortDirty = true // 添加了子元素之后,当前元素需要重新sort
}
3.2.3 排序子元素Container.sortChildren()
我们会根据zIndex属性来排序子元素,zIndex越大的元素会被排在children数组的越后面,但是注意,排序的时候,要保证相同zIndex的相对顺序不变。
public sortChildren() {
  if (!this.sortDirty) {
    return
  }

  this.children.sort((a, b) => a.zIndex - b.zIndex) // 这里用一个朴实无华的sort就行了
  this.sortDirty = false // 排序完毕后,标记这个元素的children不需要排序了
}
3.3 构建渲染图形
在3.2节里面已经简单地实现了层级关系,但是目前我们还没有可以渲染的节点,这一步里面我们将会简单地完善一下Graphics类以及相关的类,以便能够在canvas上渲染一些节点,让大家能够看到一些效果
3.3.1 Shape基类
在这个渲染引擎中支持的所有几何图形都会继承自这个Shape基类,这个基类会要求它的子类实现type属性和contains方法,type属性是为了渲染的时候,引擎能识别要渲染哪种图形,contains方法则是为了以后的碰撞检测做准备
export abstract class Shape {
  public abstract type: ShapeType
  constructor() {}
  public abstract contains(point: Point): boolean
}
3.3.2 Rectangle类
这个类用来表示矩形,这是一个比较简单的图形了,我们先实现这个图形,然后再在画布上画一些东西出来,其他的相对较复杂的图形后面再实现
export class Rectangle extends Shape {
  public x: number
  public y: number
  public width: number
  public height: number
  public type = ShapeType.Rectangle
  constructor(x = 0, y = 0, width = 0, height = 0) {
    super()
    this.x = x
    this.y = y
    this.width = width
    this.height = height
  }
  public contains(point: Point): boolean {
    return true // 碰撞检测目前还用不到,所以还没有实现这个方法
  }
}
3.3.3 Graphics.beginFill()
如果要填充图形,则需要先调用这个函数给画笔设置填充色
3.3.4 Graphics.drawRect(x: number, y: number, width: number, height: number)
调用这个函数来构造一个矩形,构造出来的矩形会被存入Graphics._geometry.graphicsData数组中,渲染的时候,会遍历这个数组,将所有图形渲染在canvas画布上。
3.4 渲染
目前我们已经可以构造一棵对象树了,现在我们要开始渲染这棵对象树。
3.4.1 前序遍历
假设我们写了如下代码
const blackGraphic = new Graphics()
blackGraphic.beginFill('black')
blackGraphic.drawRect(0, 0, 300, 300)

const redGraphic = new Graphics()
redGraphic.beginFill('red')
redGraphic.drawRect(0, 0, 200, 200)

const container1 = new Container()
container1.addChild(blackGraphic)
container1.addChild(redGraphic)

const container2 = new Container()
container2.addChild(container1)

const greenGraphic = new Graphics()
greenGraphic.beginFill('green')
greenGraphic.drawRect(150, 0, 180, 180)

container2.addChild(greenGraphic)

const yellowGraphic = new Graphics()
yellowGraphic.beginFill('yellow')
yellowGraphic.drawRect(0, 0, 250, 150)

app.stage.addChild(container2)
app.stage.addChild(yellowGraphic)
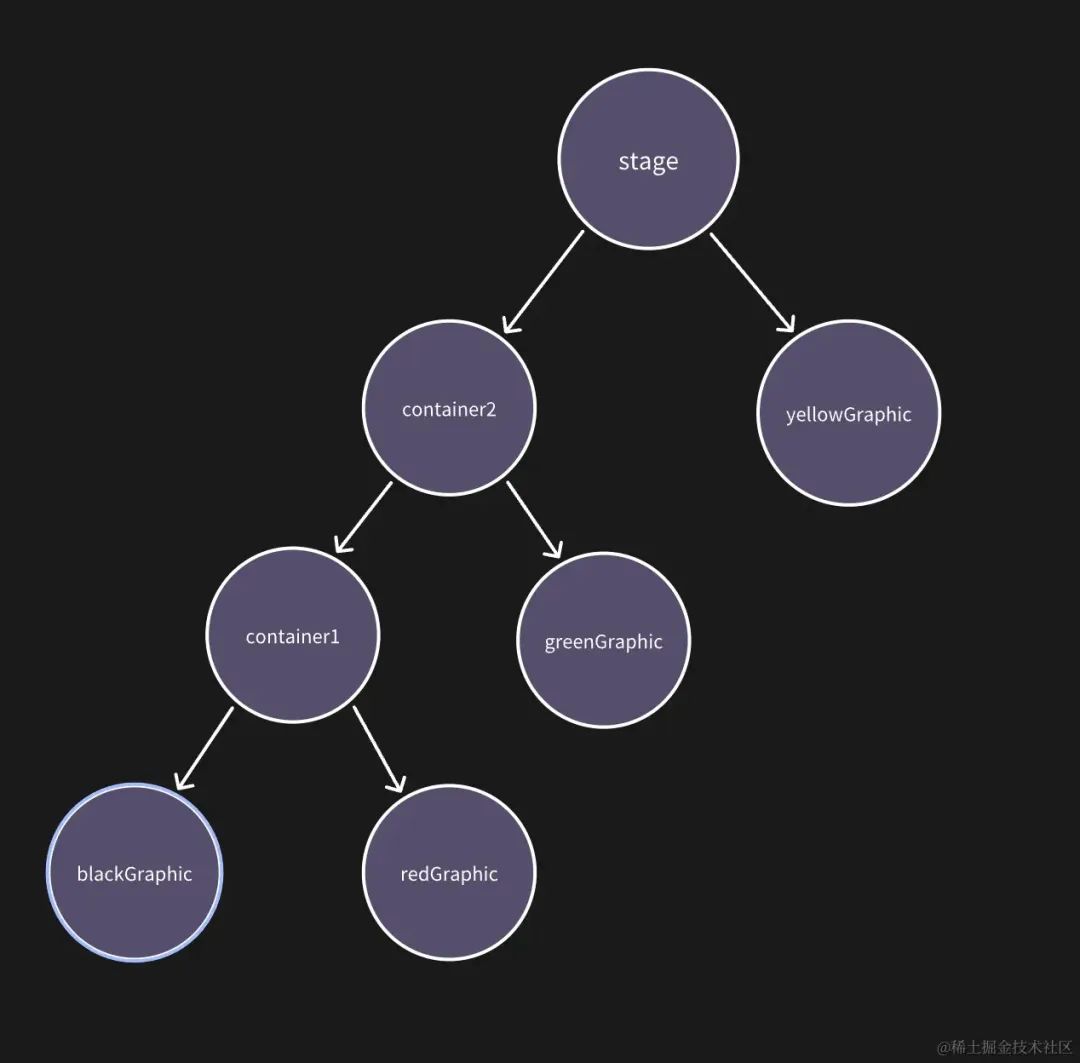
那么渲染引擎会构造出一棵这样的对象树:
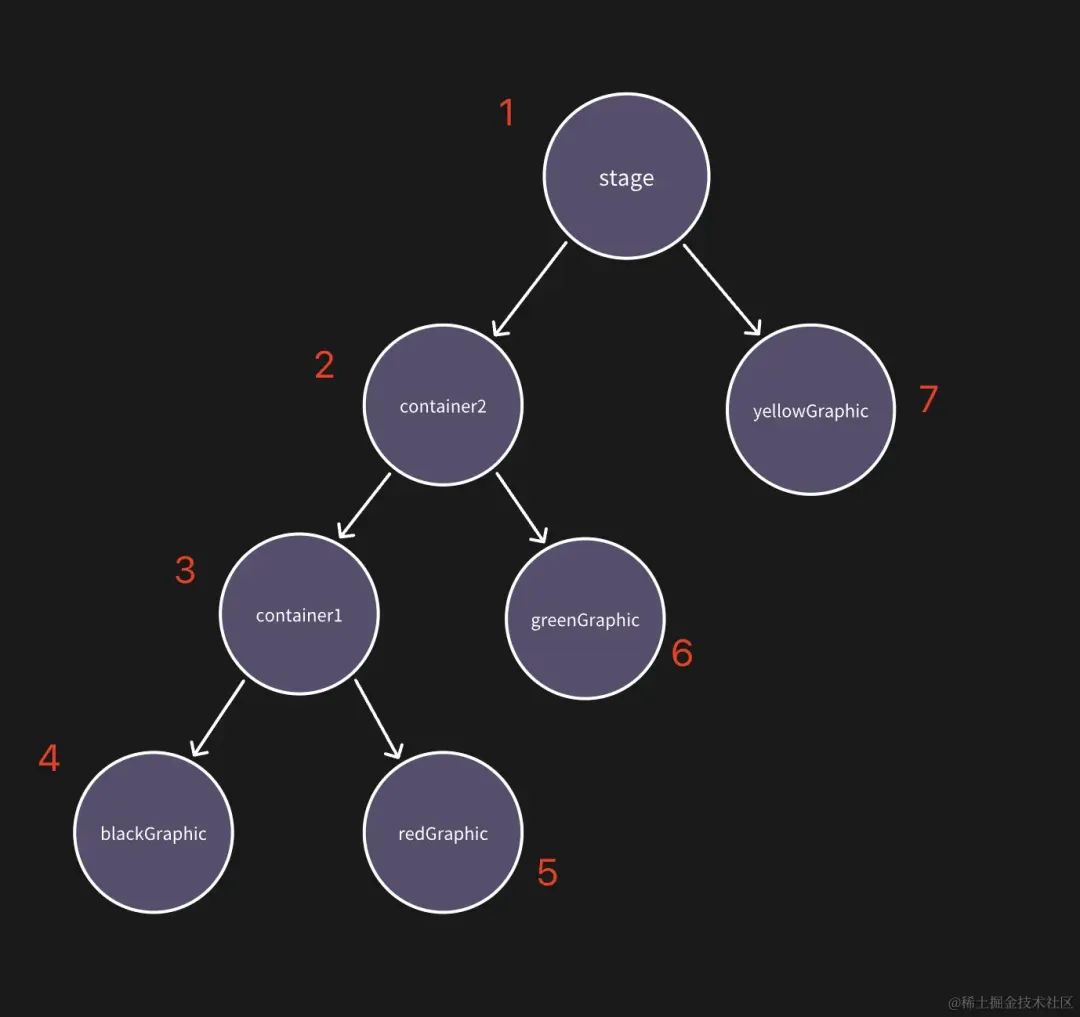
前面说了,我们的渲染策略是:子节点在父节点之上(先绘制父节点,再绘制子节点),相同层级的兄弟节点,zIndex越大,层级越高,相同zIndex,则按照添加顺序来决定,后添加的节点,层级更高(越晚绘制)。
也就是说我们期望的渲染顺序是这样的:stage->container2->container1->blackGraphics->redGraphics->greenGraphics->yellowGraphics
可以得出:我们要「先序遍历」这棵对象树,也就是说我们会先处理根节点,再递归处理子节点,直至所有节点处理完毕,退出递归。
在不断深入这棵对象树的同时,我们还要根据zIndex给每个节点的子节点进行排序。
代码如下(Container.renderCanvasRecursive)
public renderCanvasRecursive(render: CanvasRenderer) {
  if (!this.visible) {
    return
  }

  this.renderCanvas(render) // 先渲染自身

  // 渲染子节点
  for (let i = 0; i < this.children.length; i++) {
    const child = this.children[i]
    child.renderCanvasRecursive(render)
  }
}
Container.renderCanvas函数是没有内容的(Container类本身没有内容要渲染,它只是一个容器),Graphics类中重写了这个方法(目前只实现了矩形的渲染,其他图形的渲染后续补充),代码如下
protected renderCanvas(render: CanvasRenderer) {
    const ctx = render.ctx
    const { a, b, c, d, tx, ty } = this.transform.worldTransform

    ctx.setTransform(a, b, c, d, tx, ty)

    const graphicsData = this._geometry.graphicsData

    for (let i = 0; i < graphicsData.length; i++) {
      const data = graphicsData[i]
      const { lineStyle, fillStyle, shape } = data

      if (shape instanceof Rectangle) {
        const rectangle = shape
        // 先填充
        if (fillStyle.visible) {
          ctx.fillStyle = fillStyle.color
          ctx.globalAlpha = fillStyle.alpha * this.worldAlpha
          ctx.fillRect(
            rectangle.x,
            rectangle.y,
            rectangle.width,
            rectangle.height
          )
        }
        // 再stroke
        if (lineStyle.visible) {
          ctx.lineWidth = lineStyle.width
          ctx.lineCap = lineStyle.cap
          ctx.lineJoin = lineStyle.join
          ctx.strokeStyle = lineStyle.color
          ctx.globalAlpha = lineStyle.alpha * this.worldAlpha

          ctx.strokeRect(
            rectangle.x,
            rectangle.y,
            rectangle.width,
            rectangle.height
          )
        }
      }
    }
  }
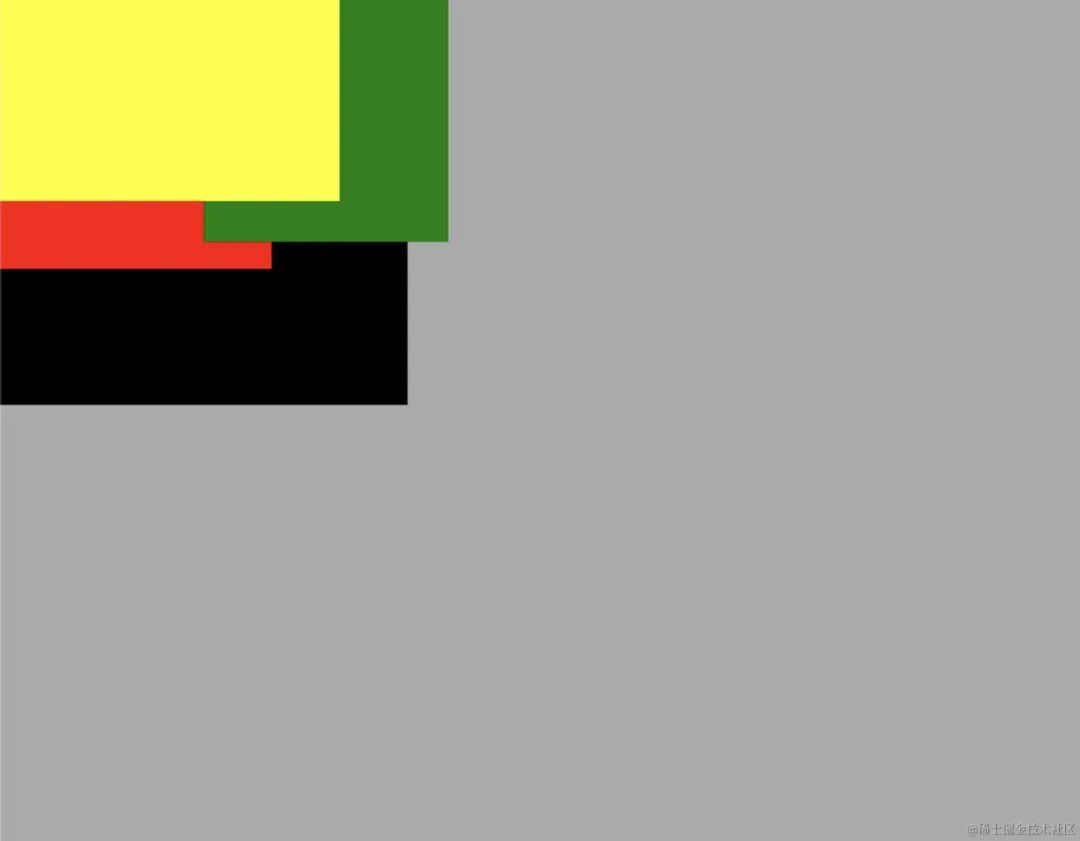
渲染出来的效果是这样的:
黑色最先被绘制,所以在最下面,接着是红色、绿色、黄色,和预期的表现是一样的。
3.4.2 自动清除与自动重新绘制
想象一下这种case,在1秒后我想让黄色的节点向右位移200px,那么我要这样做:清空画布,将黄色节点的position设置为(200,0),然后重新render一次stage,这样就可以看到我们想要的效果了。
但是,有一些步骤不应该让用户来做的,比如:清空画布、重新render一次stage,用户在使用这个渲染引擎时想要改变某个节点的位置,只需要像DOM那样:element.style.transform='translate(200px,0)'就行了,所以,渲染引擎需要自动清除画布以及重新绘制stage。
我们可以在requestAnimationFrame中进行这个操作。
export class Application {
  constructor(options: IApplicationOptions) {
    // ...
    this.start()
  }

  private render() {
    this.renderer.render(this.stage)
  }

  private start() {
    const func = () => {
      this.render()
      requestAnimationFrame(func) // 递归调用自身
    }
    func()
  }
}
移动黄色节点的代码如下
setTimeout(() => {
  yellowGraphic.position.set(200, 0)
}, 1000)
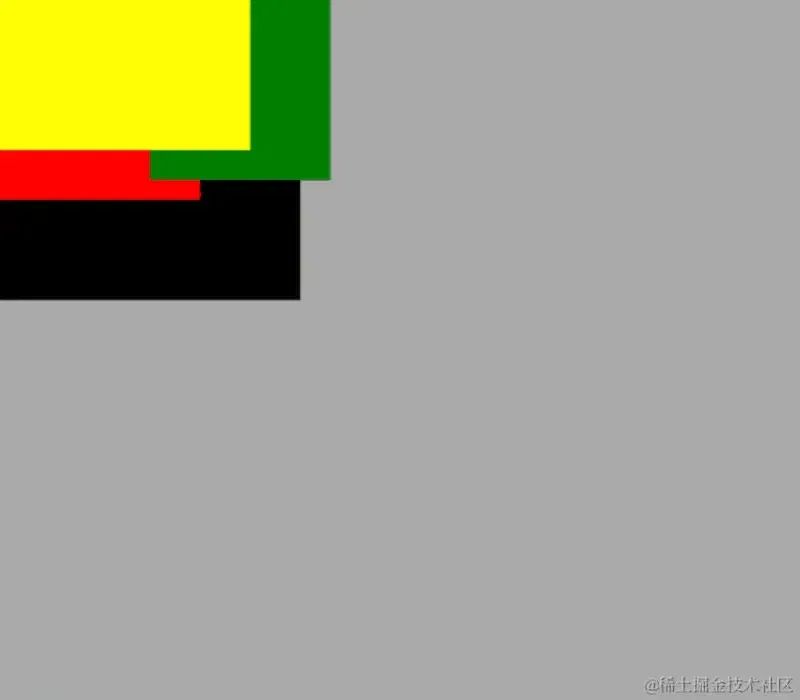
效果如下
code sandbox地址
3.5 应用了线性变换的渲染
前面我们已经渲染出了一些矩形,但是我们没有对矩形做任何线性变换操作(旋转、缩放等)。现在我们要把线性变化加入进来,实现真正的可用的渲染。
- 拿DOM举例,如果对一个div节点进行了旋转操作,那么这个div节点的所有子节点也要一并进行旋转操作,平移、缩放亦是如此,子节点的最终变换形态是由2个东西决定的:自身相对于父节点的变换,父节点相对于视窗的变换。比如:让一个子节点向右平移200px,然后让它的父节点向右平移100px,那么我们会看到子节点向右平移了300px,子节点的变换其实是(自身相对于父节点的变换)与(父节点相对于视窗的变换)的叠加。
- 上面那一段中,提到了很多次‘变换’,这些变换在我们眼里就是:旋转、平移、缩放这种操作,但是对于计算机而言,这些变换其实是一个个‘矩阵’,所有‘变换’,都可以用‘矩阵’来进行描述,也就是说,‘矩阵’就是‘变换’,‘变换’就是‘矩阵’。这些变换是可以「叠加」的,矩阵也是可以「叠加」的。
- 虽然DOM提供了transform.matrix(...)来精准地描述一个变换,但是我们平常基本不会用这个属性来对一些元素进行变换,我们更多地会用transform.rotate,transform.scale来对DOM进行变换,但是在canvas中可没有提供这么方便的属性供我们使用,canvas只接受矩阵来对空间进行线性变换,有的人可能会有疑问:ctx.rotate,ctx.translate,ctx.scale难道不是方便的属性吗?其实不是的,这3个函数和DOM的transform.rotate,transform.translate,transform.scale是完全不一样的,DOM的这3个属性会将变换应用到DOM节点上而不会影响其他DOM节点的渲染,而canvas的这3个属性会将变换应用到整个线性空间上,后续的所有渲染都会受到影响。
「我们要做的就是,实现类似于DOM的transform的效果。」
3.5.1 Transform类
这个类包含了节点的一些变换信息,如rotation(对标DOM的transform.rotate),scale(对标DOM的transform.scale),pivot(对标DOM的transform-origin),skew(对标DOM的skew)。DisplayObject会实例化这个类并挂载到transform属性上,每个DisplayObject都会有一个transform属性,就像每个DOM节点都有一个transform属性一样。
3.5.2 Transform.localTransform
这个属性代表了当前节点相对于父节点的线性变换,它的值是一个矩阵(Matrix类),更准确点说,当前节点的旋转、平移、缩放、斜切这4种变换,会用这个矩阵来表示,这个矩阵表示了这4种变换的叠加。
既然是叠加,那么必然会有先后顺序,pixijs的处理顺序是:先处理缩放,接下来是skew、旋转、平移。矩阵的左乘表示叠加另一个线性变换,所以,实际的处理方式是:Matrix(平移)xMatrix(旋转)xMatrix(skew)xMatrix(缩放)
我们可以通过追踪2个基向量来得出各种变换对应的矩阵
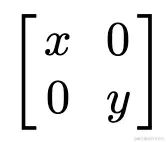
- scale(x,y)
- skew(x,y)
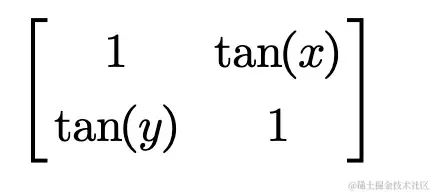
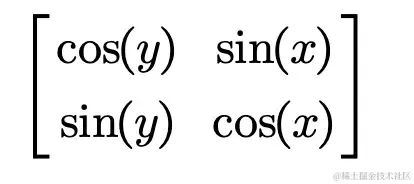
这里需要说明一下,浏览器的skew和pixijs的skew是不一样的,浏览器的skew是一种倾斜变换,pixijs的skew是一种剪刀变换,这么说有点抽象,直接上矩阵吧。
浏览器的skew(x,y):
pixijs的skew(x,y):
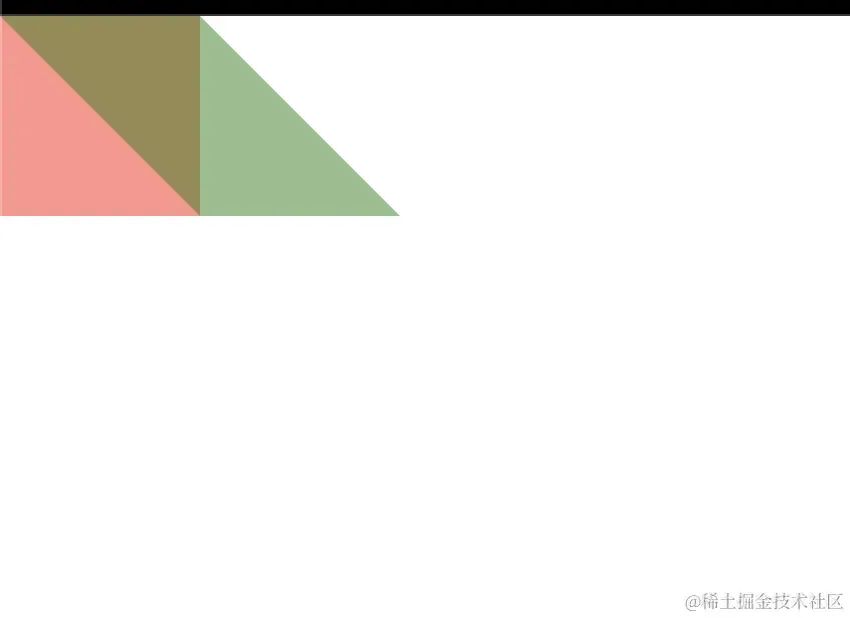
对一个DOM节点施加skew(45deg,0)是这样的效果(transform-origin设置为top left):
红色是变换之前的效果,绿色是变换之后的效果,可以看到这个元素往x轴倾斜了45度,倾斜后它的高度保持不变。
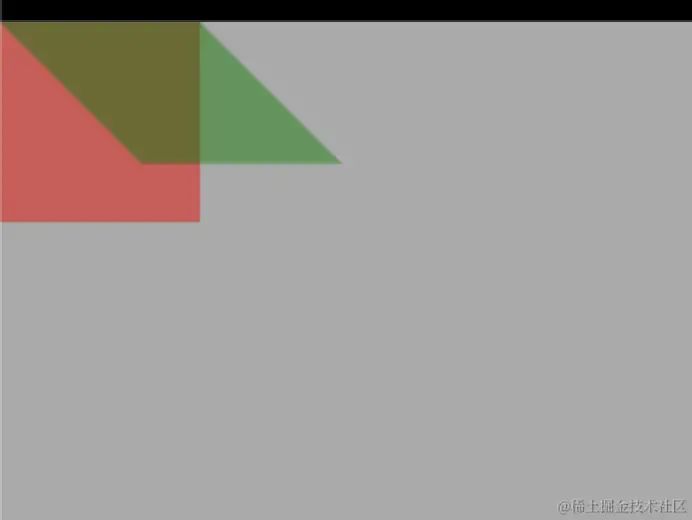
而对一个pixijs的元素施加skew(Math.PI/4,0)后是这种效果:
红色是变换之前的效果,绿色是变换之后的效果,可以看到这个元素往x轴倾斜了45度,并且它的高度已经发生了改变,但是这个元素的4条边的长度是不变的,这个变换看起来就像一把剪刀进行了一次开合,两个基向量就是这把剪刀的两刃。
在这里,我还是决定采用pixijs的skew,而不是浏览器的skew。
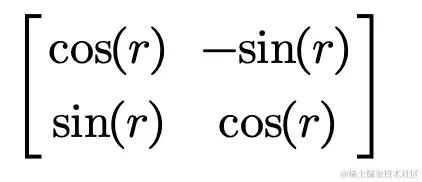
- rotation(r)
- 平移-position
对于平移的处理这一步,是比较特殊的,因为我们会在这一步里实现「锚点」并且引入仿射变换的概念。
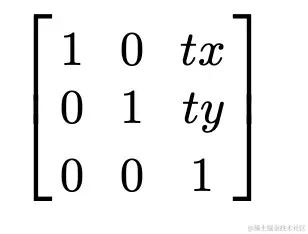
在2维空间里的平移操作,并不算一个线性的操作,因为这个操作将会移动原点,我们需要通过仿射变换来实现这个操作,具体来说就是在3维空间里操作2维空间,这样的话就能在这个2维空间上实现平移效果了。
平移的变换矩阵是:
这是一个3维矩阵,tx和ty代表了平移效果。
在pixijs中,可以这样来理解「锚点」:position设置的,是「锚点」的位置,假设position=(100,100),那么无论经过何种变换,锚点都会出现在(100,100)这个点上;除了平移变换以外的所有变换,都是围绕锚点进行的。要实现这种效果,我们的做法是:
「先计算出在经过scale、skew、rotate变换之后,锚点的位置,然后叠加一个平移变换M,将锚点挪到position(x,y)。」,这个平移变换M,就是我们要求的平移变换。
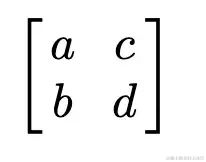
假设「scale、skew、rotate」这3个线性变换叠加后得出的矩阵是:
将锚点的坐标(pivot.x,pivot.y)左乘这个矩阵,就得到了锚点在变换后的坐标,即:
(a * pivot.x + c * pivot.y, b * pivot.x + d * pivot.y)
要将这个点移到(position.x,position.y),那么需要将这个点往X轴方向平移:
position.x-(a * pivot.x + c * pivot.y)
往Y轴方向平移:
position.y-(b * pivot.x + d * pivot.y)
这样就将锚点挪到了(position.x, position.y)
所以,平移变换对应的矩阵是:
更新Transform.localTransform的代码(Transform.updateLocalTransform)是:
private updateLocalTransform() {
  if (!this.shouldUpdateLocalTransform) {
    return
  }

  if (this.transformMatrix) {
    this.localTransform = this.transformMatrix
    return
  }

  // 旋转操作对应的矩阵
  const rotateMatrix = new Matrix(
    Math.cos(this.rotation),
    Math.sin(this.rotation),
    -Math.sin(this.rotation),
    Math.cos(this.rotation)
  )

  // skew操作对应的矩阵
  const skewMatrix = new Matrix(
    Math.cos(this.skew.y),
    Math.sin(this.skew.y),
    Math.sin(this.skew.x),
    Math.cos(this.skew.x)
  )
  // 缩放操作对应的矩阵
  const scaleMatrix = new Matrix(this.scale.x, 0, 0, this.scale.y)

  // 朴实无华的3个矩阵相乘
  const { a, b, c, d } = rotateMatrix.append(skewMatrix).append(scaleMatrix)

  /**
   * 接下来要处理平移操作了,因为要实现锚点,所以并不能简单地将平移的变换矩阵与上面那个矩阵相乘
   */
  // 首先计算出锚点在经历旋转,斜切(skew),缩放后的新位置
  const newPivotX = a * this.pivot.x + c * this.pivot.y
  const newPivotY = b * this.pivot.x + d * this.pivot.y

  // 然后计算tx和ty
  const tx = this.position.x - newPivotX
  const ty = this.position.y - newPivotY

  this.localTransform.set(a, b, c, d, tx, ty) // 更新localTransform
}
注意:在这一小节中,我们讲解的是localTransform,也就是说这里面的变换都是相对于父节点的,position=(100,100)是相对于父节点的(100,100),而不是相对于canvas视窗的(100,100),下一节将讲述相对于canvas视窗的变换。
3.5.3 Transform.worldTransform
上一节我们得到了如何将节点自身的多种变换转化成一个矩阵,这个矩阵代表的就是当前节点相对于父节点线性变换,接下来我们要得到当前节点相对于canvas视窗的线性变换。
这一节要做的事情就比上一节简单多了,我们只需要将节点自身的localTransform左乘父节点的worldTransform,就得到了自身的worldTransform。
代码如下(Transform.updateTransform):
public updateTransform(parentTransform: Transform): boolean {
  // ...

  // 自身的localTransform左乘父元素的worldTransform就得到了自身的worldTransform
  this.worldTransform = this.localTransform
    .clone()
    .prepend(parentTransform.worldTransform)

  // ...
}
得到了worldTransform后,在渲染的时候,调用canvas的ctx.setTransform,就可以讲将canvas画笔调到我们要的状态了,下面是一个例子
这是Graphics.renderCanvas中的一段代码:
const { a, b, c, d, tx, ty } = this.transform.worldTransform
ctx.setTransform(a, b, c, d, tx, ty)
3.5.4 一次完整的渲染
「第一步」:在渲染之前,我们要先更新节点树上的所有节点的localTransform以及worldTransform。通过Container.updateTransform函数来递归更新所有节点的localTransform以及worldTransform,这个函数会先序遍历节点树,先计算出自身的localTransform以及worldTransform,然后递归计算子节点的localTransform以及worldTransform。
public updateTransform() {
  this.sortChildren()

  const parentTransform = this.parent?.transform || new Transform()
  const hasWorldTransformChanged =
    this.transform.updateTransform(parentTransform)

  this.worldAlpha = (this.parent?.worldAlpha || 1) * this.alpha

  if (this.worldAlpha <= 0 || !this.visible) {
    return
  }

  for (let i = 0, j = this.children.length; i < j; ++i) {
    const child = this.children[i]

    // 若当前元素的worldTransform改变了,那么其子元素的worldTransform需要重新计算
    if (hasWorldTransformChanged) {
      child.transform.shouldUpdateWorldTransform = true
    }

    child.updateTransform()
  }
}「第二步」:递归渲染stage对象,这一点前面已经进行了说明,这里就不再进行赘述。
所以,最终的渲染代码(CanvasRenderer.render)如下:
public render(container: Container) {
  container.updateTransform()

  this.ctx.save()

  this.ctx.clearRect(0, 0, this.screen.width, this.screen.height)

  if (this.background) {
    this.ctx.fillStyle = this.background
    this.ctx.fillRect(0, 0, this.screen.width, this.screen.height)
  }

  container.renderCanvasRecursive(this)

  this.ctx.restore()
}
可以看到,除了上面提到的两步,这个函数还执行了一些额外的逻辑,即:画背景以及调用ctx.save()和ctx.restore(),画背景就不用多说了。调用ctx.save()和ctx.restore()主要是防止画笔状态的污染。ctx.save()和ctx.restore()是canvas提供的非常好用的用于保存/恢复画笔状态的函数,但是注意,每次渲染我们只会调用一次这两个函数,如果每渲染一个节点都调用一次的话,会拖慢渲染性能。
4 总结
canvas中没有节点和层级的概念,我们通过DisplayObject和Container等类,实现了节点和层级的概念;通过Transform属性实现了类似DOM的transform属性;通过叠加节点相对于父节点的变换(localTransform)和父节点相对于canvas视窗的变换(parent.worldTransform),得到了每个节点相对于canvas视窗的变换,然后调用ctx.setTransform设置画笔的状态,来进行绘制;通过requestAnimationFrame实现了自动清除画布和重新绘制。
通过以上几步,我们实现了类似DOM的「节点」和「层级关系」的概念,让用户可以像使用DOM一样使用canvas。
5 最后
目前Graphics类只支持画矩形,下一节会补充一下Graphics类,让其支持「直线、多边形、圆角矩形、圆、贝塞尔曲线」等图形。
